A JWT (JSON Web Token) is a type of security token that is used to securely transmit information between parties. It is a compact and self-contained way of representing claims to be transferred between two parties. Many API providers require you to generate a cryptographically signed JWT assertion that includes the authorization you are requesting from the server. If the server accepts the assertions you are claiming in the JWT, it will respond with an access token granting access to the API.
The following diagram shows the overall flow between a client and server using JWT assertions.
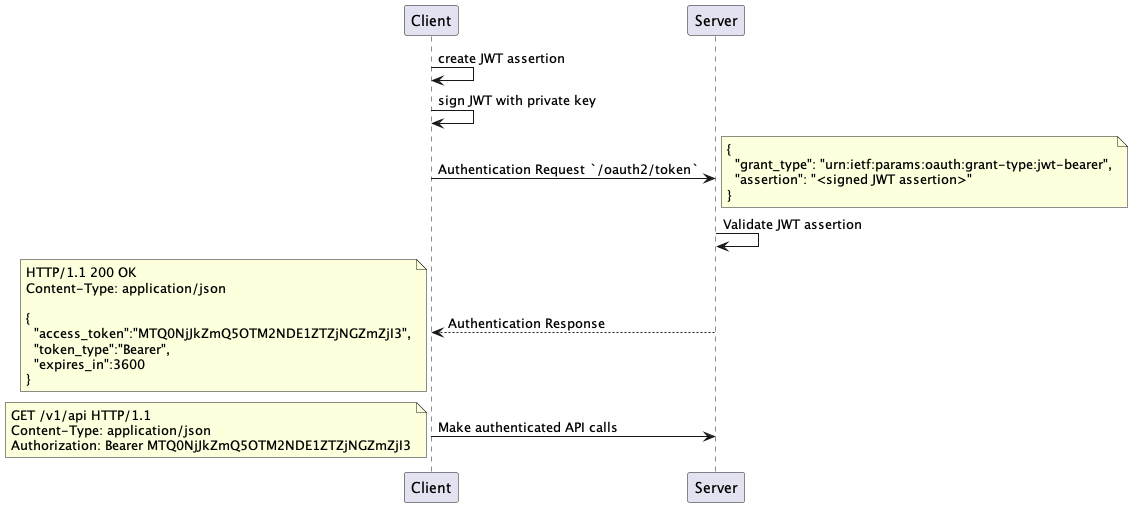
First, the client creates the JSON representation of the access they are
requesting from the server, called the JWT assertion, following the
https://jwt.io/ standard. Next, the client signs the JWT using
their private key. To authorize with the server, the client sends an
authorization request including the JWT assertion to the server’s OAuth
token granting endpoint. The server validates that the assertion was
signed by the client, and that the claims that are present in the JWT
match what the server expects from the client. If both the assertion is
signed correctly and the claims within the assertion are correct, the
server responds with an OAuth response including the access_token field
that is used in subsequent requests to the server. Once the client
receives this response, it includes the access token in subsequent
requests under the Authorization header.
Now that we have an understanding of the overall flow, we can dive in to each of the steps in more detail.
Creating a Signing Key
To use JWT assertions we need a cryptographic key to sign requests with. The details of getting this key and configuring it with your server are usually implementation dependent, but the basic idea remains the same: the client possesses a private key/public key pair, and it shares the public key with the server it wishes to authenticate with. When a JWT bearer assertion request is received by the server, it uses the client’s public key to decrypt the assertion to verify that it was signed by the client’s key.
Often, the key pair for using a particular server will be generated by the server you are authenticating against. Other times, you will need to follow the instructions in your server or APIs’s documentation to generate a key that will work with their system.
If you have an existing key pair, you can skip ahead in this article. If
not, can use openssl to generate a self-signing key we can use for the
rest of this article.
First, we use the openssl genrsa command to generate an RSA private
key:
openssl genrsa -des3 -passout pass:SomePassword -out server.pass.key 2048

Generating RSA private key, 2048 bit long modulus
.............................+++++
.................+++++
e is 65537 (0x10001)
The output file server.pass.key is an RSA private key, which is
a simple text file. We can process our key using the openssl rsa command to transform it
into a simplified representation output to server.key.
openssl rsa -passin pass:SomePassword -in server.pass.key -out server.key

writing RSA key
Next, we self-sign our key sing a certificate we generate ourselves
(server.csr). The openssl req command will ask you to enter some
details about the certificate authority that will be incorporated into
the certificate request. Since this is self-signed request for testing
purposes you can enter any details that make sense for your use case. The
openssl x509 will generate a PEM and self-sign with the certificate
request we generated. Lastly, the openssl pcks8 command transforms our
PEM file into pkcs8 format, which is often what is required by APIs:
openssl req -new -key server.key -out server.csr
openssl x509 -req -sha256 -days 365 -in server.csr -signkey server.key -out server.crt
openssl pkcs8 -topk8 -inform PEM -outform DER -in server.key -out private_key.pkcs8 -nocrypt
At the end of this process, you will private key in pcks8 format ready
for use in the rest of this article.
Creating the JWT assertion
Now that we have a private key, we can begin the process of generating a signed JWT assertion that will be verified by the server. The JWT follows the format given by RFC 7519.
The JWT assertion is made of three parts: the header, the payload, and
the signature. These three parts are separated by dots (.). Therefore,
a JWT typically looks like the following.
xxxxx.yyyyy.zzzzz
Creating the Header
The JWT header is used to encode metadata about the token itself. The
header typically consists of two parts: the type of the token, which is
JWT, and the signing algorithm being used, such as SHA256 or RSA.
For example, the following header declares the token is of type JWT and
uses the RSA signing algorithm.
{
    "alg": "RS256",
    "typ": "JWT"
}
Then, this JSON is base64 URL encoded form the first part of the JWT. For
example, the following bash script declares a JWT header, and uses the
openssl base64 command to encode it in URL-safe base64.
HEADER="{\"alg\":\"RS256\"}"
(printf "%s" "$HEADER" | openssl base64 -A | tr '+/' '-_' | tr -d '=')
eyJhbGciOiJSUzI1NiJ9
The output string eyJhbGciOiJSUzI1NiJ9 serves as the header for our
JWT.
Creating the Payload
The JWT payload is the second part of the token. This portion contains the claims. Claims are statements about an entity (typically, the user) along with any additional metadata the server implementation requires.
The JWT standard includes a set of “registered” claims which are not mandatory but are recommended to provide interoperability between implementations.
| PARAMETER | DESCRIPTION |
|---|---|
iss | The issuer must contain the OAuth client_id or name of the application that you used to register your certificate with the server. |
aud | The audience is server you are authenticating with. This might be https://login.salesforce.com for example. |
sub | The principal or subject you are authenticating as. This could be a user, or it could be the client_id you used as the issuer for a server-to-server authorization. |
exp | The date and time at which the token expires, expressed as the number of seconds from 1970-01-01T0:0:0Z measured in UTC. |
For example, here is a full set of JWT claims for an example Salesforce API.
{
    "iss": "my-client-id",
    "sub": "my@email.com",
    "aud": "https://login.salesforce.com",
    "exp": "1333685628"
}
Like the header, this payload is base64 URL encoded to form the second part of the JWT.
ISSUER=my-client-id
SUBJECT=my@email.com
AUDIENCE=https://login.salesforce.com
EXP=1333685628

PAYLOAD="{\"iss\": \"${ISSUER}\", \"sub\": \"${SUBJECT}\", \"aud\": \"${AUDIENCE}\", \"exp\": ${EXPIRY}\"}"
(printf "%s" "$PAYLOAD" | openssl base64 -A | tr '+/' '-_' | tr -d '=')
eyJpc3MiOiAibXktY2xpZW50LWlkIiwgInN1YiI6ICJteUBlbWFpbC5jb20iLCAiYXVkIjogImh0dHBzOi8vbG9naW4uc2FsZXNmb3JjZS5jb20iLCAiZXhwIjogIn0
The long string serves as the payload for our JWT.
Creating the Signature
The last part of the JWT is the signature. To create the signature part you have to take the encoded header and the encoded payload, and sign the two with your private key using the algorithm specified in the JWT header.
For example, if we combine output of the two previous calls into a string
called TOKEN, we can sign that token using the private key we
previously generated. Concatenating those results with a . in between
gives us our full JWT.
TOKEN="$(printf "%s" "$HEADER" | openssl base64 -A | tr '+/' '-_' | tr -d '=').$(printf "%s" "$PAYLOAD" | openssl base64 -A | tr '+/' '-_' | tr -d '=')"

SIGN="$(printf "%s" "$TOKEN" | openssl dgst -sha256 -sign "${KEY}" -binary | openssl base64 -A | tr '+/' '-_' | tr -d '=')"

echo "${TOKEN}.${SIGN}"
Putting it all Together
The following bash script puts everything together with two small
additions. First, we include a jti in the claim. The jti is a unique
identifier for the JWT and acts as a cryptographic
nonce. Not all
servers require a jti, but it is included in this example. In our
script, we generate a UUID to use as the jti. Second, we set the exp,
or expiry of the JWT, to 3600 seconds past the current time as
a convenience.
#!/bin/bash
if [[ -z "$ISSUER" || -z "$SUBJECT" || -z "$AUDIENCE" || ! -f "$KEY" ]]; then
  echo "Usage: AUDIENCE=your_audience ISSUER=your_issuer SUBJECT=your_subject KEY=/path/to/your_private.key $0"
  exit 1
fi

uuid=
function generateUuid()
{
    local N B T X
    for (( N=0; N < 16; ++N )); do
        B=$(( $RANDOM%255 ))
        if (( N == 6 )); then
            printf -v X '4%x' $(( B%15 ))
            uuid+=$X
        elif (( N == 8 )); then
            local C='89ab'
            printf -v X '%c%x' ${C:$(( $RANDOM%${#C} )):1} $(( B%15 ))g
            uuid+=$X
        else
            printf -v X '%02x' $B
            uuid+=$X
        fi
        for T in 3 5 7 9; do
            if (( T == N )); then
                uuid+='-'
                break
            fi
        done
    done
}

generateUuid

EXPIRY="$(date '+%s')"
EXPIRY=$((EXPIRY+3600))
JTI="$uuid"
HEADER="{\"alg\":\"RS256\"}"
PAYLOAD="{\"iss\": \"${ISSUER}\", \"sub\": \"${SUBJECT}\", \"aud\": \"${AUDIENCE}\", \"exp\": ${EXPIRY}, \"jti\": \"${JTI}\"}"

TOKEN="$(printf "%s" "$HEADER" | openssl base64 -A | tr '+/' '-_' | tr -d '=').$(printf "%s" "$PAYLOAD" | openssl base64 -A | tr '+/' '-_' | tr -d '=')"

SIGN="$(printf "%s" "$TOKEN" | openssl dgst -sha256 -sign "${KEY}" -binary | openssl base64 -A | tr '+/' '-_' | tr -d '=')"

echo "${TOKEN}.${SIGN}"
Example Usage
AUDIENCE=your_audience \
ISSUER=your_issuer \
SUBJECT=your_subject \
KEY=/path/to/your_private.key \
./generate-token.sh