API Gateway supports a reasonable payload size limit of 10MB. One way to work within this limit, but still offer a means of importing large datasets to your backend, is to allow uploads through S3. This article shows how to use AWS Lambda to expose an S3 signed URL in response to an API Gateway request. Effectively, this allows you to expose a mechanism allowing users to securely upload data directly to S3, triggered by the API Gateway.
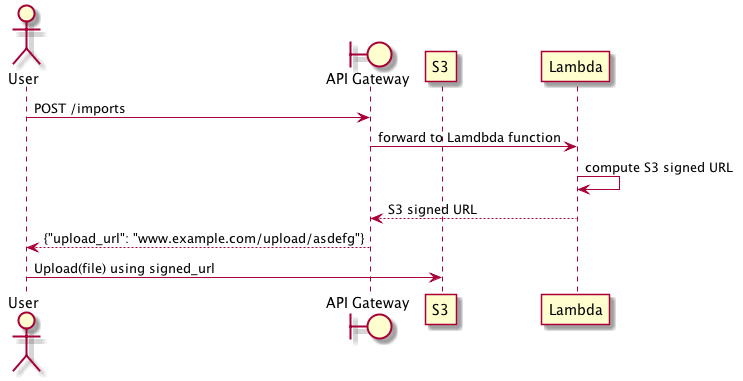
The basic flow of the import process is as follows: the user makes an API, which is served by API Gateway and backed by a Lambda function. The Lambda function computes a signed URL granting upload access to an S3 bucket and returns that to API Gateway, and API Gateway forwards the signed URL back to the user. At this point, the user can use the existing S3 API to upload files larger than 10MB.
In practice, implementing this idea requires several interconnected parts: an S3 bucket, a Lambda function, and the API Gateway. Let’s walk through how to create a working upload system using these components.
First, we need an S3 bucket for storing our data. All objects in S3 are private by default and only the object owner has permission to access these objects. However, the object owner can optionally share objects with others by creating a pre-signed URL, using their own security credentials, to grant time-limited permission to upload or download the objects. We are going to take advantage of this feature to allow users to upload objects to an otherwise private S3 bucket.
Second, we need a Lambda function that generates pre-signed URLs in response to user API requests. In this example, we will use the Python AWS SDK to create our Lambda function.
Third, we need to expose our Lambda function through API Gateway. This requires creating a basic API that proxies requests to and from Lambda. We will define this API using Swagger and import it to API Gateway to start serving requests.
The S3 Bucket
The S3 bucket can be created via the AWS user interface, the AWS command line utility, or through CloudFormation. The only requirement is that the bucket be set to allow read/write permission only for the AWS user that created the bucket. This is the default set of permissions for any new bucket.
For example, we can easily create a new S3 bucket using AWS CLI by running the following command:
$ aws s3 mb s3://<my-unique-bucket>
The Lambda function
Given your bucket name, you can test you have everything setup correctly by generating a pre-signed URL. In the following example, we use the Python AWS SDK (boto) to generate the signed URL and then use cURL to upload data using a PUT request.
import os
import boto3

# Get the service client.
s3 = boto3.client('s3')

temp_url = s3.generate_presigned_url(
    ClientMethod='put_object',
    Params={
        'Bucket': '<my-unique-bucket>',
        'Key': '<my-key>'
    }
)

# Upload a file named 'test.txt' using cURL
os.system('curl --request PUT --upload-file ./test.txt "' + temp_url + '"')
API Gateway expects responses to be returned as JSON, which corresponds to a Python dictionary. We can convert this simple test program into a Lambda function usable by API Gateway by returning the signed url as a JSON payload.
import uuid

import boto3


def lambda_handler(event, context):
    # Get the service client.
    s3 = boto3.client('s3')

    # Generate a random S3 key name
    upload_key = uuid.uuid4().hex

    # Generate the presigned URL for put requests
    presigned_url = s3.generate_presigned_url(
        ClientMethod='put_object',
        Params={
            'Bucket': '<my-unique-bucket>',
            'Key': upload_key
        }
    )

    # Return the presigned URL
    return {
        "upload_url": presigned_url
    }
Finally, we zip this function and upload it to AWS as a new Lambda
function. Assuming your function is named url_signer.py,
$ zip -r UrlSigner.zip url_signer.py
Now, we can create the lambda function. Caution must be taken here: the IAM role assigned to the Lambda function must have read/write access to S3 so that it can create the signed URLs, and it must be assumable by Lambda.
This implies the role must have the following policy granting access to S3.
{
  "Version": "2012-10-17",
  "Statement": [
    {
      "Effect": "Allow",
      "Action": "s3:*",
      "Resource": "*"
    }
  ]
}
And the following trust relationship, which makes the role assumable by Lambda functions.
{
  "Version": "2012-10-17",
  "Statement": [
    {
      "Effect": "Allow",
      "Principal": {
        "Service": "lambda.amazonaws.com"
      },
      "Action": "sts:AssumeRole"
    }
  ]
}
With this in place, you can create your Lambda function:
aws lambda create-function \
    --region us-east-1 \
    --function-name urlsigner \
    --zip-file fileb:///<path-to-zip>/UrlSigner.zip \
    --handler url_signer.lambda_handler \
    --runtime python2.7 \
    --role <your-arn>
API Gateway
At this point, we have an S3 bucket, and a Lambda function that creates signed URLs for uploading to that bucket. The last step is creating the API Gateway frontend that calls the Lambda function. For API Gateway to invoke a Lambda function, you must attach a role assumable by API Gateway that has permission to call Lambda’s InvokeFunction action.
This means you must have a role capable of being assumed by API Gateway with the following trust relationship:
{
  "Version": "2012-10-17",
  "Statement": [
    {
      "Sid": "",
      "Effect": "Allow",
      "Principal": {
        "Service": "apigateway.amazonaws.com"
      },
      "Action": "sts:AssumeRole"
    }
  ]
}
And this role must be able to invoke Lambda functions using the following policy:
{
    "Version": "2012-10-17",
    "Statement": [
        {
            "Effect": "Allow",
            "Action": "lambda:InvokeFunction",
            "Resource": "*"
        }
    ]
}
Now we can define the final API. It is fairly straightforward: we define a single API endpoint that integrates with the Lambda function we previously created, and that has the correct role for executing the Lambda function. This API returns the signed URL for uploading directly to S3.
---
swagger: '2.0'
info:
  title: Signed URL Import Service
  description: |
    An import service for uploading data to an S3 bucket through a signed URL.
  version: v1

consumes:
- application/json
produces:
- application/json
schemes:
- https

definitions:
  Job:
    type: object
    properties:
      upload_url:
        description: A self-expiring signed URL for uploading files.
        type: string

paths:
  /import/:
    post:
      summary: Create a new import job.
      responses:
        200:
          description: Created
          schema:
            "$ref": "#/definitions/Job"
      x-amazon-apigateway-integration:
        type: "aws"
        uri: "arn:aws:apigateway:us-east-1:lambda:path/2015-03-31/functions/arn:aws:lambda:us-east-1:820873945423:function:urlsigner/invocations"
        httpMethod: "POST"
        credentials: "arn:aws:iam::820873945423:role/ApiGatewayRole"
        responses:
          "default":
            statusCode: "200"
            responseTemplates:
              application/json: |-
                {
                  "upload_url": $input.json('$.upload_url')
                }
You can use the AWS user interface to create a new API using this definition, and deploying it as an API stage.
The Final Result
Now you should be able to make a POST request to your import endpoint and be returned a signed URL:
$ http POST https://<...>.execute-api.us-east-1.amazonaws.com/v1/import
HTTP/1.1 200 OK
Connection: keep-alive
Content-Length: 609
Content-Type: application/json
Date: Tue, 23 May 2017 20:37:28 GMT

{
    "upload_url": "https://s3.amazonaws.com/<your-bucket-id>/..."
}
You can use the signed URL to upload data directly to S3.