DynamoDB provides built-in support for cross regional data replication using a solution AWS calls global tables. This article shows how to build and run an application in Kubernetes that uses global tables to replicate data between regions. In the event of a regional disaster, a secondary Kubernetes cluster in a secondary region has all the data from DynamoDB replicated locally to continue operation.
How global tables work
A DynamoDB global table is a set of multiple replica tables. Each replica table exists in a different AWS region, but all replicas have the same name and primary key. Whenever data is written to any replica table, the data is automatically replicated to all other replica tables that have been added to the global table.
Because any replica in a global table can accept both reads and writes, there are some potential issues with data consistency to be aware of. Notably, DynamoDB does not support strongly consistent reads across regions. Therefore, if you write to one region and read from another region, the read response might include stale data that doesn’t reflect the results of recently completed writes in the other region. Furthermore, if applications update the same item in different regions at about the same time, conflicts can happen as the data is replicated because each table does not know which update was causally “first”. To resolve conflicts, DynamoDB uses a last writer wins policy to settle where the last write that is written to any replica table gets propagated to all replica tables, potentially overwriting data that was stored in a replica that received an edit locally that was behind an edit received in a replica elsewhere.
For the purposes of this article, we are using DynamoDB in a disaster recovery scenario where users are only directed to one region to perform reads and writes, and in the case of a regional failure, users are directed to a separate region. In this case, the application can work without any modification. If you require an active-active deployment where any table can be modified by any writer then you need to design your application in a way that matches the eventually consistent reads and last-writer wins constraints of global tables.
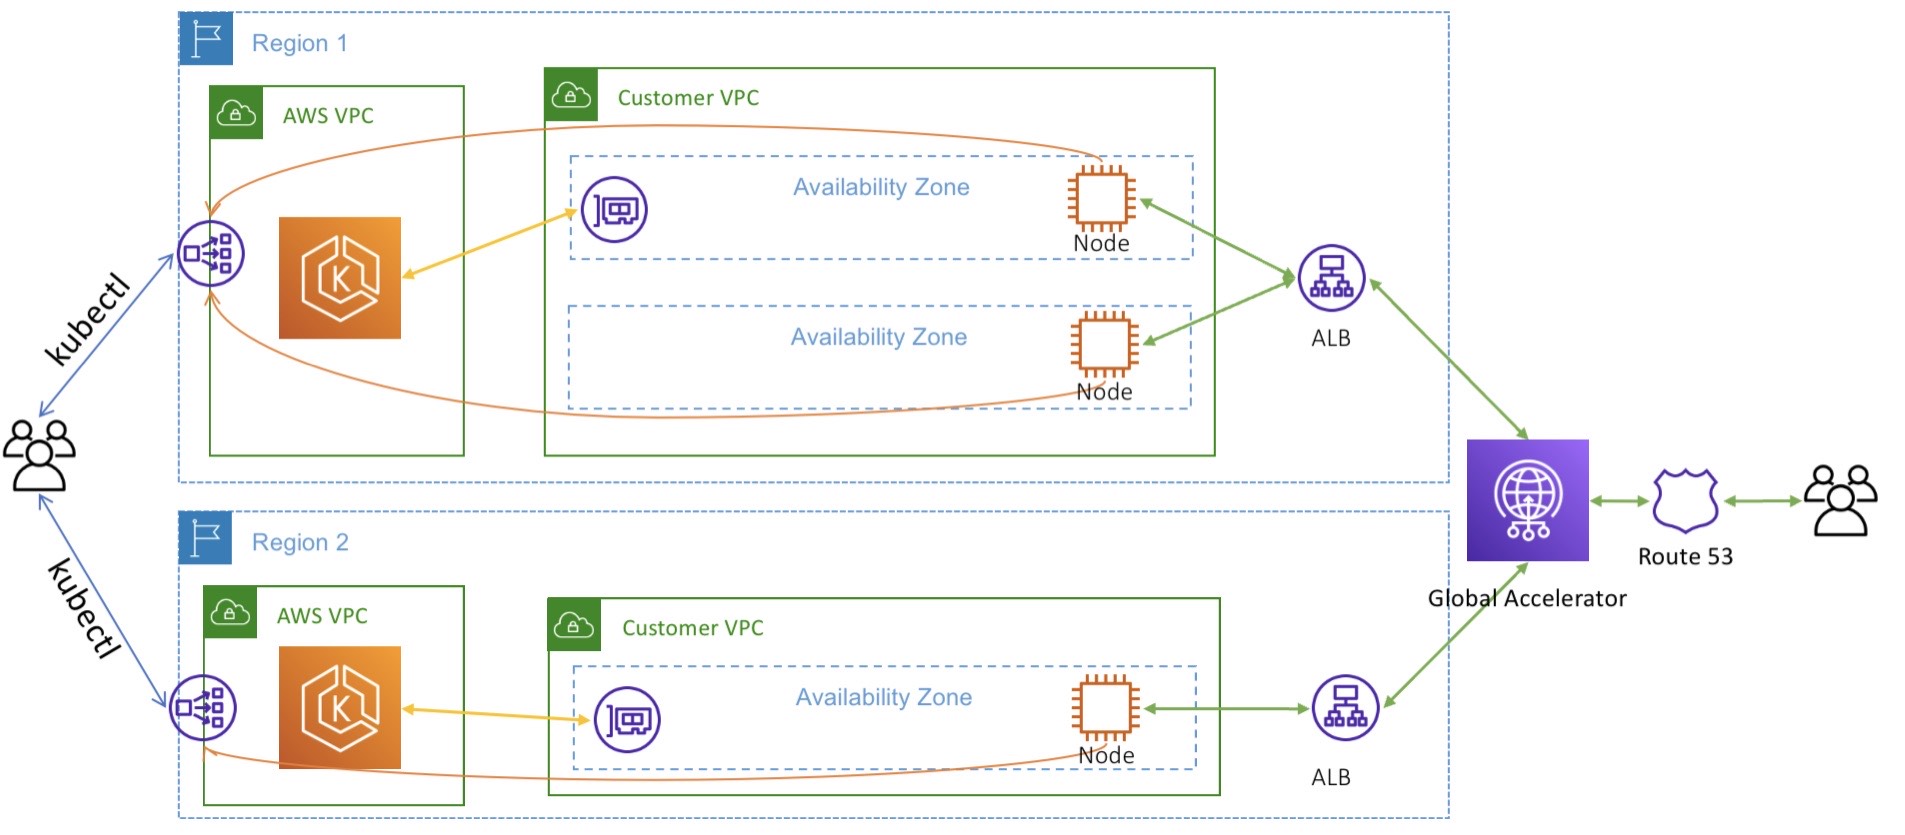
Multi-region Kubernetes with EKS
I’m assuming in this article that you have two Kubernetes clusters
deployed in two separate AWS regions. You can follow the guidance in
this
article
to get started. The end result will be an architecture like in the
diagram below: two EKS clusters in isolated VPCs in us-east-1 and
us-west-2 with AWS Global Accelerator configured to direct traffic
between them.
With this setup in place, let’s see how to deploy a Kubernetes service that uses DynamoDB global tables to support disaster recovery.
Setting up IAM roles for Service Accounts
The first thing we need to do to is configure a service account for our Kubernetes deployment using IAM Roles. IAM Roles for Service Accounts grants containerized workloads running on Kubernetes permissions to access AWS services or resources using traditional AWS IAM roles.
Creating the IAM Policy
The following JSON document specifies an IAM policy allowing all access
to a specific DynamoDB table called users, in addition to the indexes
for that table. For example purposes, this policy applies to resources on
any AWS account and region. You can of course make it more restrictive by
limiting access to the specific account and regions where you intend to
deploy to your global table.
{
  "Statement": [
    {
      "Action": "dynamodb:*",
      "Effect": "Allow",
      "Resource": [
        "arn:aws:dynamodb:*:*:table/users",
        "arn:aws:dynamodb:*:*:table/users/index/*"
      ],
      "Sid": "AllAPIActionsOnUsers"
    }
  ],
  "Version": "2012-10-17"
}
You can create the policy using this file via the AWS CLI.
aws iam create-policy --policy-name dynamo-iam-policy --policy-document file://iam-policy.json
Since IAM is a global AWS resource, you only need to create this policy
once, and it will be accessible in any AWS region. This is convenient for
us because we can use the same policy across both the us-east-1 and
us-west-2 regions.
Creating the Service Account
With our policy in place, you can create a Kubernetes service account
using eksctl.
eksctl create iamserviceaccount \
    --name dynamo-sa \
    --cluster sookocheff-us-east-1 \
    --attach-policy-arn "<the-dynamodb-policy-arn>" \
    --approve
After executing this command you should see a CloudFormation stack has been created. In my case, the stack is given a name that represents the EKS cluster, Kubernetes namespace, and service account name that will be created.
eksctl-sookocheff-us-east-1-addon-iamserviceaccount-default-dynamo-sa
The resource created by the stack is an IAM Role with our DynamoDB Policy attached.
In addition to the IAM Role, this command creates a service account in our Kubernetes cluster. A Kubernetes service account gives pods an identity that they can assume for the lifetime of the pod. When a service account resource is created, a JWT token is automatically created as a Kubernetes secret. The secret can then be mounted into Pods and used to make authenticated requests.
You can see the service account that was created using kubectl. The
annotations on the service account list the IAM Role used and the ARN of
that Role.
❯ kubectl describe sa dynamo-sa
Name:                dynamo-sa
Namespace:           default
Labels:              app.kubernetes.io/managed-by=eksctl
Annotations:         eks.amazonaws.com/role-arn: arn:aws:iam::<your-account>:role/eksctl-sookocheff-us-east-1-addon-iamservicea-Role1-<your-role>
Image pull secrets:  <none>
Mountable secrets:   <none>
Tokens:              <none>
Events:              <none>
Attaching the Service Account to our Pod
To allow a Pod to use the service account and its associated IAM role, AWS installs a validating and mutating Kubernetes webhook in every EKS cluster. This webhook listens to any create pod API calls and injects a JWT into our pods with credentials attached based on the annotations on the Pod deployment.
Specifying the service account to use for a Pod deployment is as simple
as stating it in the Pod spec using the serviceAccountName field. For
example, the following simple deployment includes serviceAccountName: my-service-account. Upon deploying this service, the IAM Roles for
Service Accounts webhook installed in our EKS cluster will react by
mutating the deployment and injecting the correct credentials into the
Pod at runtime. When we (finally) deploy our DynamoDB service to
Kubernetes we will need to set serviceAccountName to dynamo-sa to
match the service account we created.
apiVersion: apps/v1
kind: Deployment
metadata:
  name: my-app
spec:
  selector:
    matchLabels:
      app: my-app
  template:
    metadata:
      labels:
        app: my-app
    spec:
      serviceAccountName: my-service-account
      containers:
      - name: my-app
        image: public.ecr.aws/nginx/nginx:X.XX
Configuring DynamoDB Global Tables
I tried for quite some time to use the boto3 Python SDK to create a DynamoDB global table, but that feature is not supported at the time of writing — I could not figure out how to create a table with elastic read/write throughput which is a requirement of Global Tables. Instead, I created an initial table using boto, and then modified it manually using the AWS console to first set read/write throughput to elastic and second add replicas to create global table.
Using boto3 and Python, you can create a DynamoDB table using the
following function. If you are following along, the key points are to use
a schema where username and last_name are attributes of the table,
both of String type. username is a partition key and last_name is
a sort key.
def create_table(self, table_name):
    """
    Creates an Amazon DynamoDB table that can be used to store user data.

    :param table_name: The name of the table to create.
    :return: The newly created table.
    """
    try:
        self.table = self.dyn_resource.create_table(
            TableName=table_name,
            KeySchema=[
                {
                    'AttributeName': 'username',
                    'KeyType': 'HASH'
                },
                {
                    'AttributeName': 'last_name',
                    'KeyType': 'RANGE'
                }
            ],
            AttributeDefinitions=[
                {
                    'AttributeName': 'username',
                    'AttributeType': 'S'
                },
                {
                    'AttributeName': 'last_name',
                    'AttributeType': 'S'
                },
            ],
            ProvisionedThroughput={
                'ReadCapacityUnits': 5,
                'WriteCapacityUnits': 5
            }
        )

        self.table.wait_until_exists()
Once created, you can navigate to this table in the AWS console and create a replica. This will require first updating the throughput to be elastic, and then specifying a region for the replica. AWS will do the work of setting up the replica and copying the data between tables in each region.
Now we can finish out the rest of our simple application that adds and lists users. We start with a simple class that wraps our table with the ability to add users and list existing ones.
class Users:
    """Encapsulates an Amazon DynamoDB table of use data."""

    def __init__(self, dyn_resource):
        """
        :param dyn_resource: A Boto3 DynamoDB resource.
        """
        self.dyn_resource = dyn_resource
        # The table variable is set during the scenario in the call to
        # 'exists' if the table exists. Otherwise, it is set by 'create_table'.
        self.table = None

    def create_table(self, table_name):
        """
        Creates an Amazon DynamoDB table that can be used to store user data.

        :param table_name: The name of the table to create.
        :return: The newly created table.
        """
        try:
            self.table = self.dyn_resource.create_table(
                TableName=table_name,
                KeySchema=[
                    {
                        'AttributeName': 'username',
                        'KeyType': 'HASH'
                    },
                    {
                        'AttributeName': 'last_name',
                        'KeyType': 'RANGE'
                    }
                ],
                AttributeDefinitions=[
                    {
                        'AttributeName': 'username',
                        'AttributeType': 'S'
                    },
                    {
                        'AttributeName': 'last_name',
                        'AttributeType': 'S'
                    },
                ],
                ProvisionedThroughput={
                    'ReadCapacityUnits': 5,
                    'WriteCapacityUnits': 5
                }
            )

            self.table.wait_until_exists()

        except botocore.exceptions.ClientError as error:
            if error.response['Error']['Code'] == 'ResourceInUseException':
                self.table = self.dyn_resource.Table(table_name)
            else:
                raise error

        return self.table.table_status

    def add_user(self, profile):
        """
        Adds a user to the table.

        :param profile: A user profile.
        """
        _, last_name = profile['name'].split()

        self.table.put_item(
           Item={
                'username': profile['username'],
                'last_name': last_name,
            }
        )

        return profile

    def list_users(self):
        """
        Scans for users in the table.
        """
        users = []
        scan_kwargs = {}

        done = False
        start_key = None
        while not done:
            if start_key:
                scan_kwargs["ExclusiveStartKey"] = start_key
            response = self.table.scan(**scan_kwargs)
            users.extend(response.get("Items", []))
            start_key = response.get("LastEvaluatedKey", None)
            done = start_key is None

        return users
Next, we can run a simple Flask server with API endpoints for adding and listing users to test our functionality. In this example, I’m reading the regional DynamoDB endpoint and AWS region as environment variables that we will need to set on our deployment.
dynamo_endpoint = os.environ.get("DYNAMO_ENDPOINT", "http://localhost:8000")
dynamo_region = os.environ.get("AWS_REGION", "us-east-1")

dynamo_client = boto3.client('dynamodb',
                          endpoint_url=dynamo_endpoint,
                          region_name=dynamo_region)
dynamodb = boto3.resource('dynamodb',
                          endpoint_url=dynamo_endpoint,
                          region_name=dynamo_region)
users = Users(dynamodb)
fake = Faker()

users.create_table('users')

app = Flask(__name__)

@app.route('/dynamodr')
def index():
    return jsonify(users.list_users())


@app.route('/dynamodr/add-user')
def add_user():
    return jsonify(users.add_user(fake.profile()))


if __name__ == '__main__':
	app.run(host='0.0.0.0', port=5000)
We can containerize this simple app with an equally simple Dockerfile.
FROM --platform=linux/amd64 python:3.11-slim-bullseye

WORKDIR /app

COPY requirements.txt /app
RUN --mount=type=cache,target=/root/.cache/pip \
    pip install -r requirements.txt

COPY . /app

ENTRYPOINT ["python"]
CMD ["app.py"]
The only requirements listed in requirements.txt are:
boto3==1.29.0
Faker==20.0.3
Flask==3.0.0
Deploying the App
For both our us-east-1 and us-west-2 regions, we can deploy our app
using the following spec. You will need to update the location of the
container image to wherever your container registry lives and make sure
to push the test app to that registry. This spec creates a Deployment
from our container, a Service allowing access to our Deployment over port
80, and an Ingress allowing web traffic to reach our Service. Not the
serviceAccountName: dynamo-sa line that grants the pod access to the
IAM role and policy we created earlier.
apiVersion: apps/v1
kind: Deployment
metadata:
  name: dynamodr
  labels:
    app.kubernetes.io/name: dynamodr
spec:
  selector:
    matchLabels:
      app.kubernetes.io/name: dynamodr
  replicas: 1
  template:
    metadata:
      labels:
        app.kubernetes.io/name: dynamodr
    spec:
      terminationGracePeriodSeconds: 0
      serviceAccountName: dynamo-sa
      containers:
        - name: dynamodr
          image: <your-container-registry>/<your-container-tag>-amd64
          imagePullPolicy: Always
          ports:
            - name: app-port
              containerPort: 5000
          env:
            - name: AWS_REGION
              value: "${AWS_REGION}"
            - name: DYNAMO_ENDPOINT
              value: "https://dynamodb.${AWS_REGION}.amazonaws.com"
---
apiVersion: v1
kind: Service
metadata:
  name: dynamodr
  labels:
    app.kubernetes.io/name: dynamodr
spec:
  type: ClusterIP
  selector:
    app.kubernetes.io/name: dynamodr
  ports:
    - name: svc-port
      port: 80
      targetPort: app-port
      protocol: TCP
---
apiVersion: networking.k8s.io/v1
kind: Ingress
metadata:
  name: default-ingress
spec:
  ingressClassName: nginx
  rules:
    - http:
        paths:
          - path: /dynamodr
            pathType: Prefix
            backend:
              service:
                name: dynamodr
                port:
                  name: svc-port
Deploy this to each region using the following commands:
> AWS_REGION=us-east-1 envsubst < service.yaml | kubectl apply -f -
> AWS_REGION=us-west-2 envsubst < service.yaml | kubectl apply -f -
Your service is now accessible from the URL of the load balancer for each region. If you capture that URL in two different terminal sessions — one for each AWS region, you can start adding users to your table and view those additions being replicated across regions.
First, get the URL of the load balancer for your EKS cluster:
> export NLB_URL=$(kubectl get -n kube-system service/ingress-nginx-controller \
    -o jsonpath='{.status.loadBalancer.ingress[0].hostname}')
Then, begin adding users.
> curl ${NLB_URL}/dynamodr/add-user
Now, in each terminal you can list users and see that users are added to the tables in both regions and that regardless of where you add data, the other table will be updated to reflect your changes! We now have a fully replicated DynamoDB cluster in two Kubernetes in two different AWS regions.
> curl ${NLB_URL}/dynamodr
Failing over Traffic
If you followed the previous article on setting up a multi-region EKS cluster, you will have Global Accelerator pointing to the two load balancers in each AWS region. You can use Global Accelerator to failover traffic by routing a percentage of traffic to each region.
To simulate a disaster recovery scenario, you can route 100% of traffic
to us-east-1, and then follow that by routing 100% of traffic to
us-west-2. Any data that has been persisted in your main site will be
added and available in the table in your failover site.