A common pattern when scaling a SaaS application is to deploy your stack to multiple regions across the globe. Deploying to multiple regions helps distribute the application and data closer to the user, and isolates infrastructure in case of an outage in a single region. If your application is deployed in this configuration, you have the new problem of routing users to the correct region based on their tenancy or geography. This post shows how to create a global login portal that directs users to the correct local region where they can access their application.
For the purposes of this article, our application can be simplified into a deployment that focuses on only the core details.
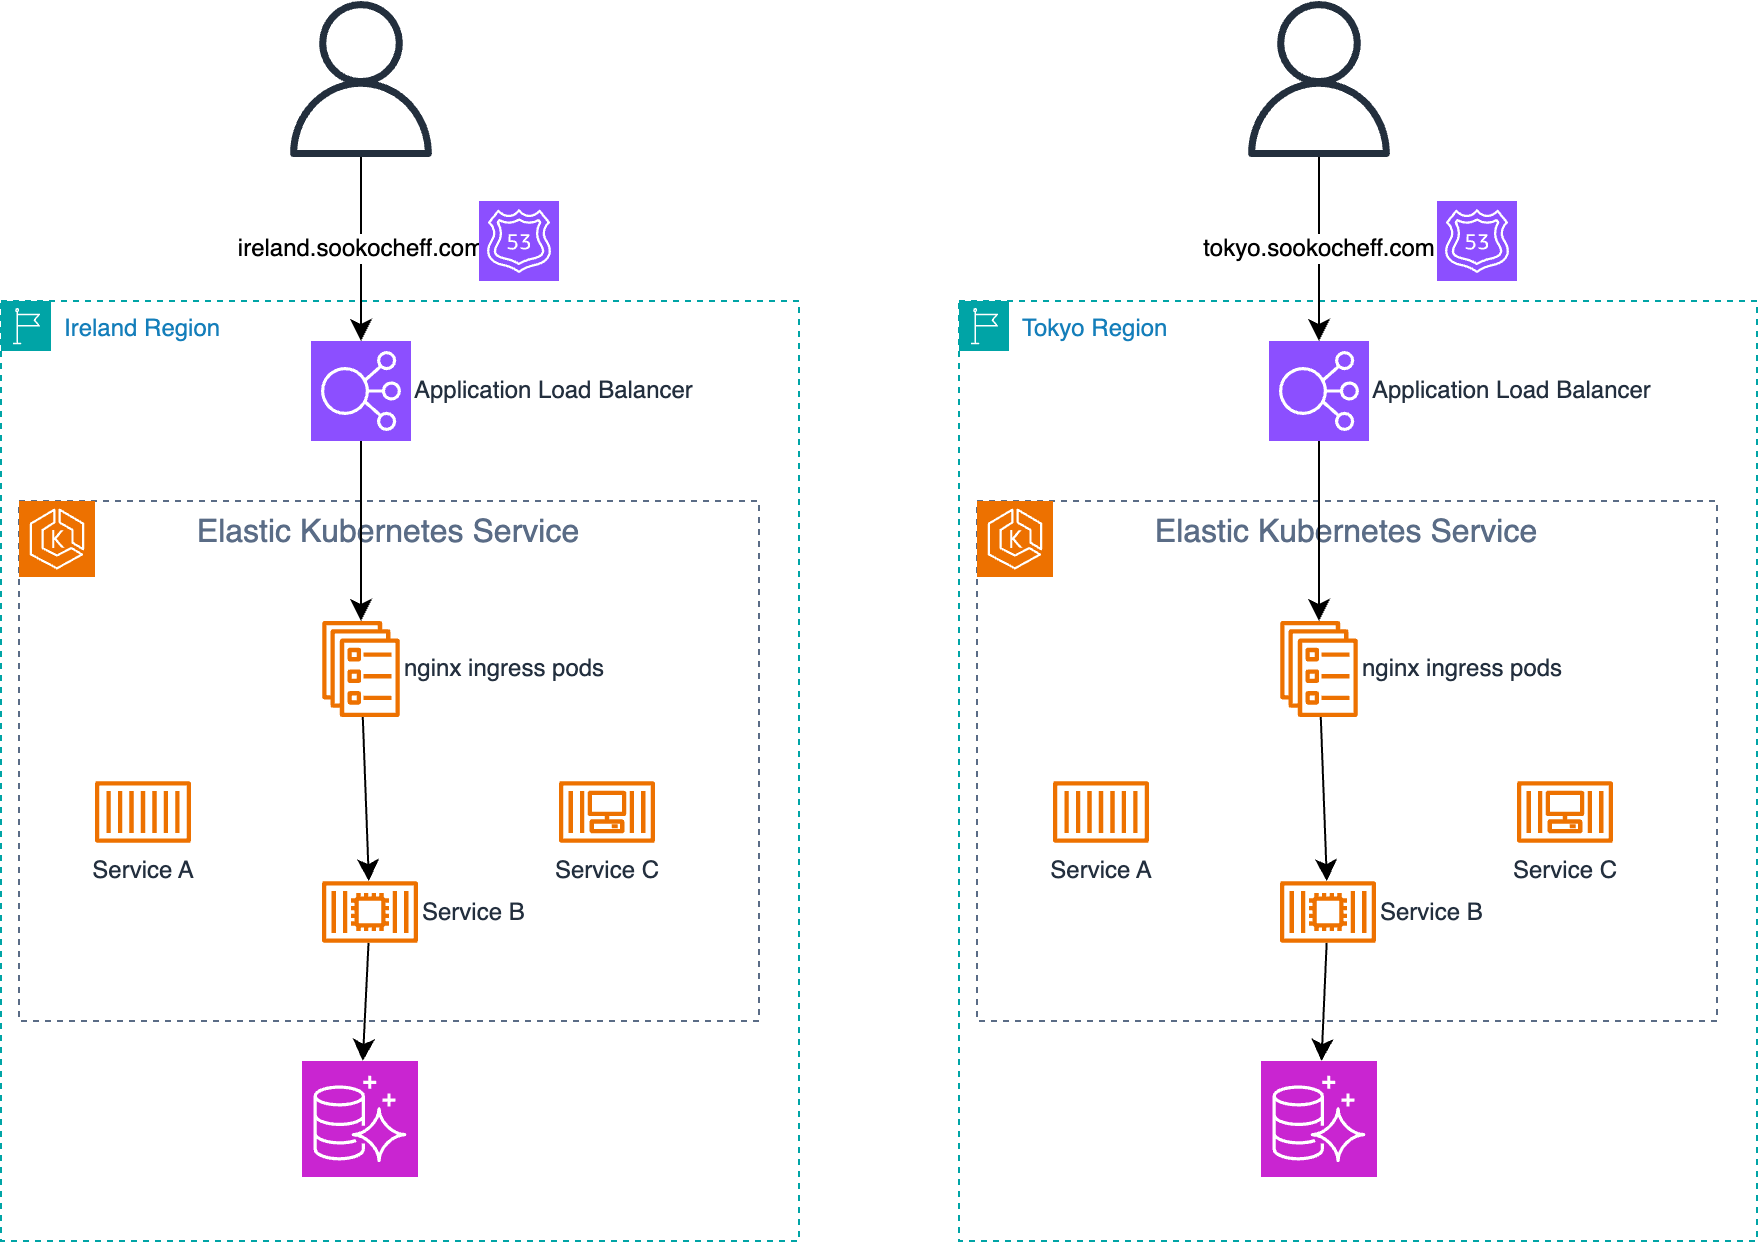
In this deployment, each region has a unique DNS name in Route53. DNS is configured to resolve to an application load balancer in a specific AWS region, and the load balancer directs traffic to the associated Kubernetes cluster through Nginx ingress pods. Each of the Kubernetes services that requires persistent data uses a regional deployment of Aurora or DynamoDB.
With this design, each regional deployment is completely independent.
Based on the domain name you use, you will be directed to a unique region
with a unique set of data. Users in Tokyo login with the
tokyo.sookochef.com domain name, and users in Ireland login with the
ireland.sookocheff.com, and each work on their own data completely
separately.
To improve user experience as we roll out additional regions, we would
prefer a design with a single domain name (say app.sookocheff.com) that
could route to one out of a set of regions. This would also help with
disaster recovery: a single domain name and login experience can direct
users to a failover region when required.
Architecture Overview
To accomplish our goals, we will use a system with the architecture depicted in this diagram.
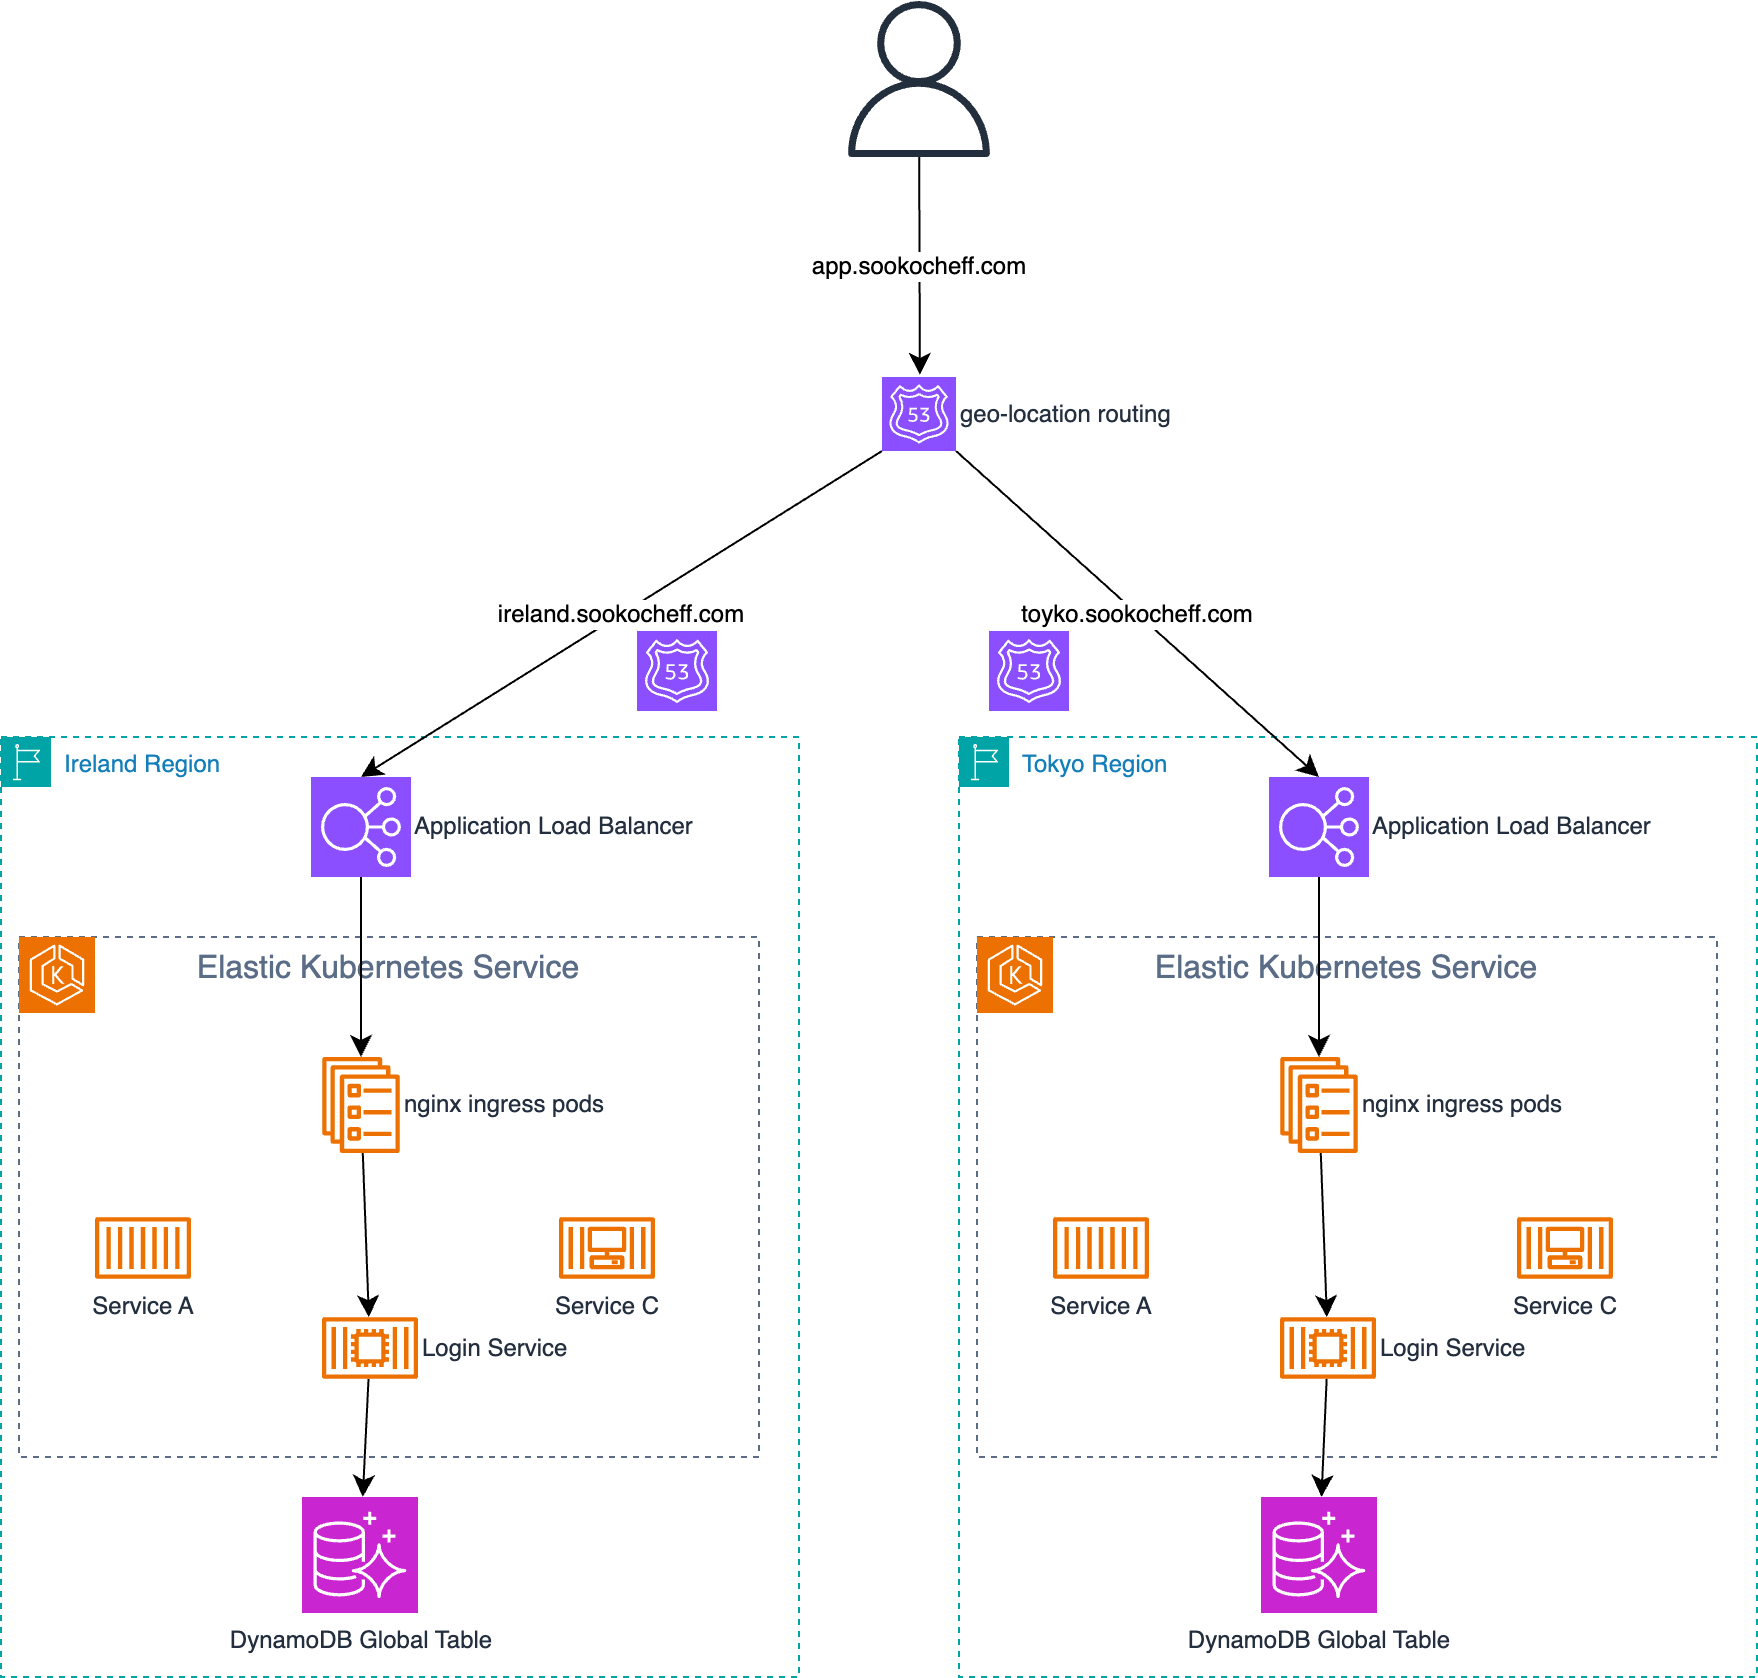
The system deploys a simple traffic management application to every
region, and routes requests to that application by geolocation — the user
is routed to the traffic management application in the region closest to
the application. This access point is behind the global domain name
app.sookocheff.com.
From a user perspective, our simplified example requires you to select your “home” region when you sign up — this is where your primary data resides. On subsequent login attempts, we retrieve the region that you created your account in, and either log the user in to the current region, or redirecting the user to the correct region that they signed up in. In the majority of cases, geolocation load balancing will direct the user to the region they signed up in. But in cases where a user is on vacation or working remotely from a different geolocation, they will be redirected to the correct location to login.
The key to making this work is that each instance of the login application must know about the users that have signed up in different regions. This means that the data backing the login application needs to use an active-active model where any data committed in one region needs to be replicated to all regions. This is a key distinction from the rest of the application where data is resident to the region.
Building the System
I built a prototype of this system using DynamoDB Global Tables and the
Flask web framework. The login application is fairly simple: you can sign
up for an account, specifying your home region. The call to
users.add_user adds the required data to a DynamoDB Global Table. See
Disaster Recovery with DynamoDB Global Tables
for more on how to create and use the DynamoDB table.
@app.route('/signup', methods=['POST'])
def signup():
    if request.method == 'POST':
        email = request.form['email']
        password = request.form['password']
        region = request.form['region']

        users.add_user(email, password, region)

        return render_template('login.html',
                               msg="Signup Complete. Login to your account!")

    # else render index
    return render_template('index.html')
Once the user is added, Dynamo Global Tables will replicate the data to
the configured regions. Logging in to the application is now fairly
simple: the call users.passcheck will verify that an entry in the
Dynamo table with the correct email exists, and that the password in that
table matches the password given by the user. If there is a match, and we
are in the wrong region, we redirect to the correct login page. If there
is a match, and we are in the correct region, we render the home page.
@app.route('/login', methods=['POST'])
def check_password():
    email = request.form['email']
    password = request.form['password']
    region = users.passcheck(email, password)

    # Account does not exist
    if not region:
        return render_template('index.html',
                               region=dynamo_region,
                               msg="Access denied. Incorrect username/password combination.")

    # We are in the wrong region, redirect
    if region != dynamo_region:
        if region == REGION_EAST:
            return redirect(f"{HOST_EAST}/login", code=301)
        if region == REGION_WEST:
            return redirect(f"{HOST_WEST}/login", code=301)

    # Success! We have a password match, and we are in the correct region
    return render_template('home.html', region=dynamo_region)
Now the last step is to set your Route53 routing to use geolocation. Geolocation routing makes it possible to load-balance users load across endpoints in a predictable, easy-to-manage way, so that each user location is consistently routed to the same endpoint. For the vast majority of use cases, this works out of the box for routing users to the correct region. In the case where the user is directed incorrectly, we use the data stored in Dynamo Global Tables to route the user to the correct region to complete their work.