I’m a fan of Java. If you haven’t given it a chance in a while, you may not have noticed that, Java has quietly been adopting some of the best practices that make dynamic and functional languages so appealing, without sacrificing the many hundred person-years of effort that have made Java and the JVM a world-class development environment. Java is still one the world’s most popular programming languages with roughly 9 million programmers using Java. It doesn’t make sense to ignore all of that history and development effort because of a niggling feeling that Java is a little too verbose, or that XML is so last year.
Yet it can still be difficult to convince people that Java is a valid choice for modern web development. Compounding this problem is the sheer volume of choice for newbie Java developers — it can be simply overwhelming to get started with Java. This post attempts to cut through the noise by providing an opinionated starting point for building a modern Java web application using Spring Boot and Visual Studio Code. Follow along with me as we go from nothing but an editor window to a full-fledged, performant, testable, and secure web application built with Spring Boot and Java.
Part 1: Setting Up
Java development on Visual Studio Code (VS Code) requires a few extensions to be installed for an optimal experience. Thankfully, if you get stuck anywhere along the way, the VS Code documentation provides an excellent tutorial.
Installing the Java Extension Pack for Visual Studio Code
In contrast to IDEs such as IntelliJ or Eclipse, the concept of a “Java project” is entirely foreign to Visual Studio Code. Instead, VS Code provides extensions to support Java projects. Depending on the popularity of the language, the extension marketplace for VS Code can be a bit of a minefield of unsupported, deprecated, or just broken projects. Thankfully, Microsoft curates or maintains extensions for most popular languages, and a recent addition to the extension marketplace includes the concept of packs — collections of extensions that work well together to fully support a language.
The Java Extension
Pack
is maintained by Microsoft and bundles the most popular VS Code extensions for
Java in one place. To get started with Java in VS Code, install the Java
Extension Pack by navigating to the extension in the
marketplace
or do it through VS Code itself by opening the extension sidebar with
CTRL+SHIFT+X, searching for Java Extension Pack, and clicking install.
After the necessary Java extensions are installed, opening a VS Code workspace that contains Java artifacts will cause those extensions to load and understand those artifacts and present options for working with them.
Installing Spring Boot Extensions
Spring and Spring Boot are additional libraries and frameworks for building Java
applications. Like Java itself, VS Code knows nothing about Spring and requires
extensions to support it. There are three extensions in particular that are
worth installing to provide full support for Spring Boot: Spring Initializr,
Spring Boot Tools, and Spring Boot Dashboard. Spring
Initializr
is an extension to generate a Spring Boot project and maintain Spring Boot
dependencies. Spring Boot
Tools
provides additional support for editing .properties and .yml files for
Spring Boot projects, and the extension provides additional support for editing
.java files in Spring projects. Lastly, Spring Boot
Dashboard
provides a view to manage Spring Boot projects in your workspace, allowing you
to quickly start, stop or debug a Spring Boot project.
Go ahead and install these extensions. They will help us get started with Spring Boot.
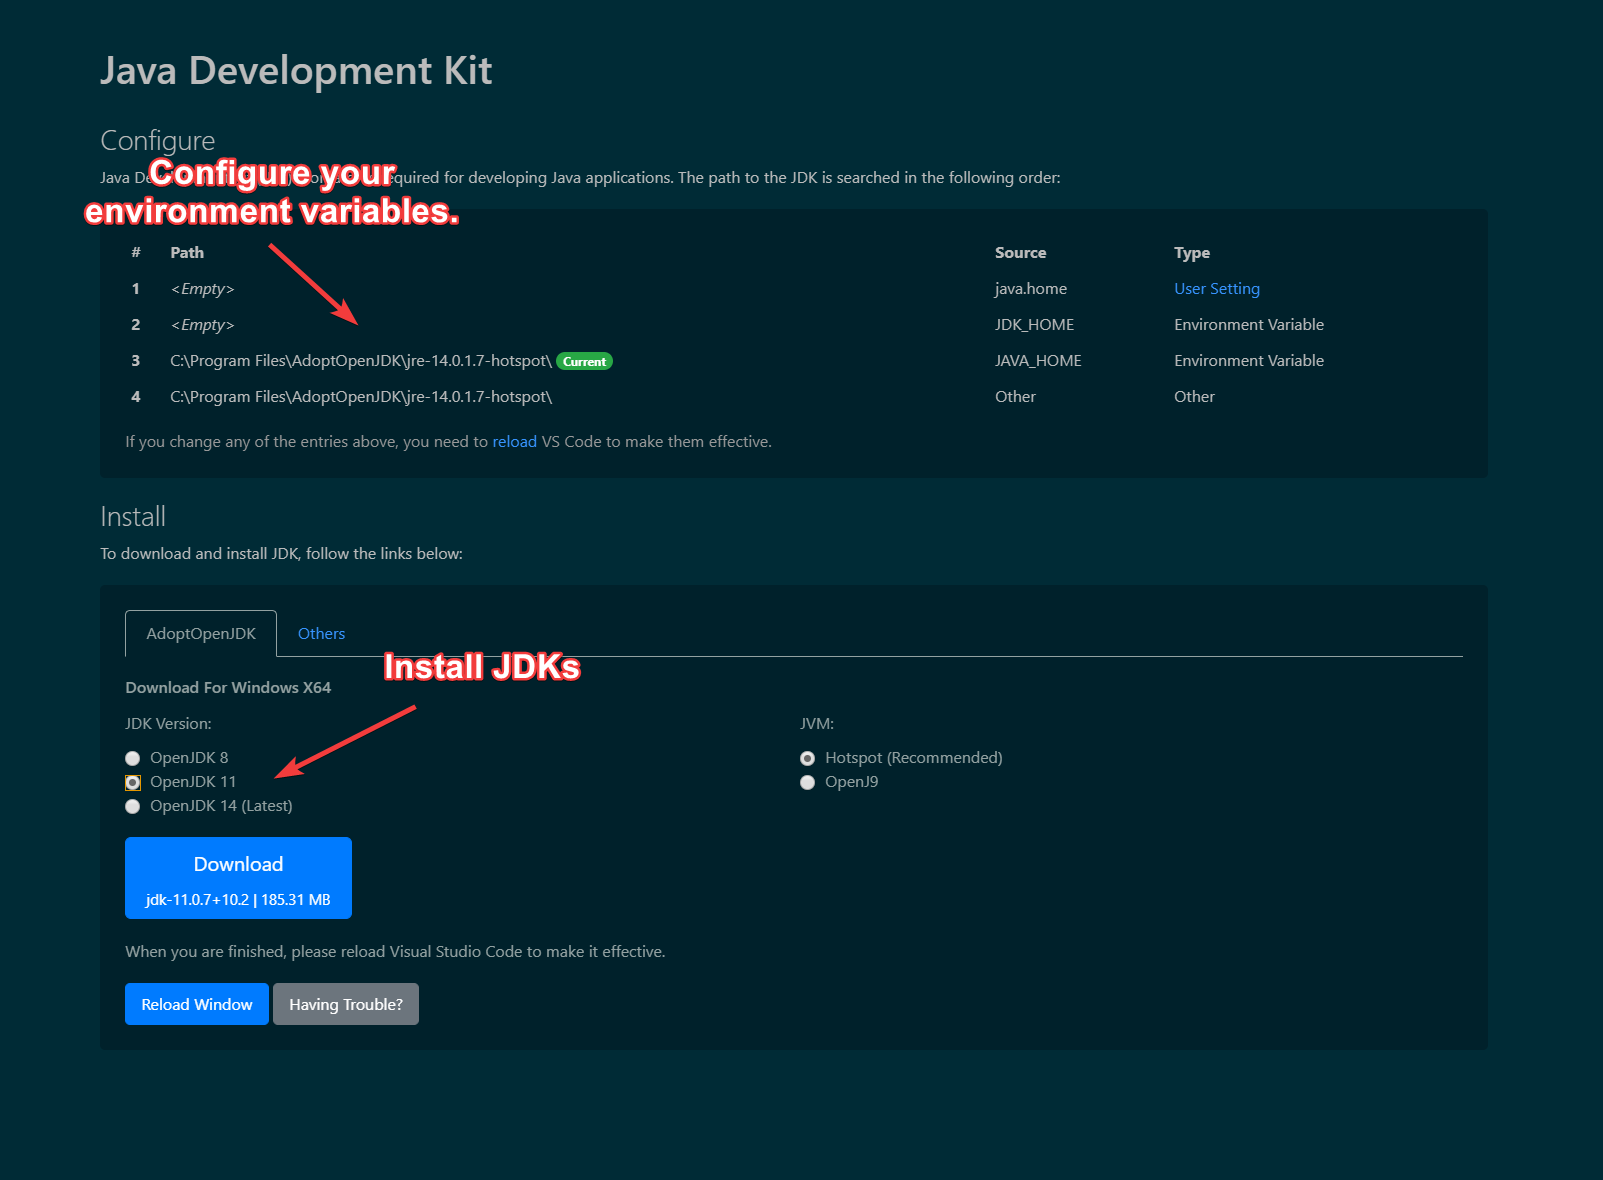
Configuring the JDK
You can configure the JDK used by VS Code using the Java: Configure Java Runtime command. To do this, bring up the Command Palette with CTRL+SHIFT+P
and type Java: Configure Java Runtime to select the command. From here you can
install a JDK and view or update your settings to make sure that the environment
variables JDK_HOME and JAVA_HOME are set correctly. To set environment
variables in Windows, follow this
tutorial.
For macOS or Linux, follow this
tutorial
Part 2: Creating a Basic Spring Boot Project
Spring comes with a tool called Spring initializr which is available online at
https://start.spring.io/ and is integrated into VS
Code through the Spring
Initializr
extension we installed earlier. You can run the Initalizr through the VS Code
Command Palette (CTRL+SHIFT+P) and type Spring Initializr: Generate a Maven Project. Follow the prompts to create your project with these settings:
- Specify a project language.
Java - Input Group Id for your project. I used
com.sookocheff. - Input Artifact Id for your project. I used
springdemo. - Specify Spring Boot version.
2.2.7 - Search for dependencies. Select
Spring Boot DevToolsandSpring Web
Create your project in a new folder to get started. Once done, you can open the
project folder in VS Code. On the left-hand sidebar in File Explorer mode you
can see a Spring-Boot Dashboard heading. Within this heading you can start and
stop your Spring Boot application. You can also use the standard VS Code run
configuration created for you in .vscode/launch.json.
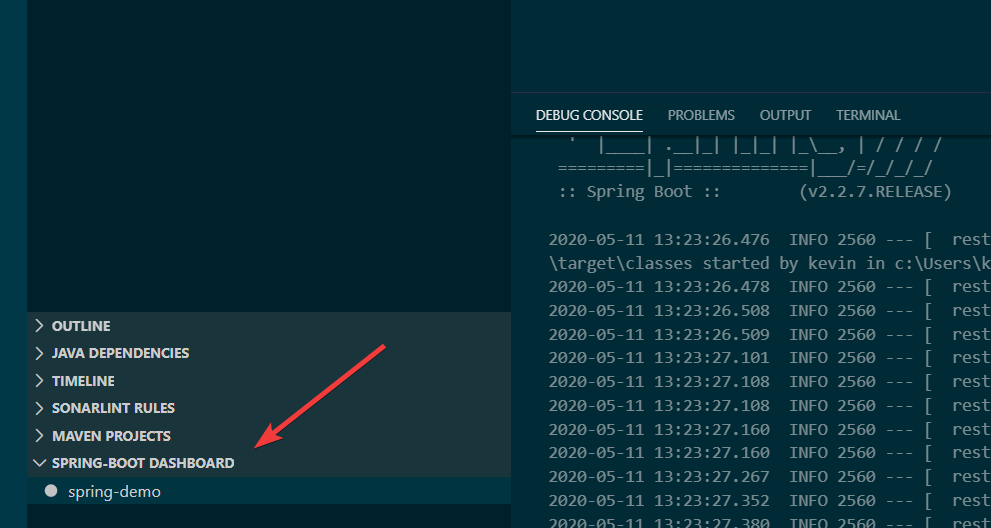
Go ahead and start the application using the Spring-Boot Dashboard, which runs
an embedded Tomcat server instance making your application available from
localhost:8080. Navigate to that URL using your browser to see your running
Tomcat server (which throws an error because nothing is implemented yet).

What did Spring Initializr do to me?
Although it’s nice to get up and running quickly, I tend to be distrustful of magic, so let’s dive deeper into the starter project to uncover what Spring Initializr did for us.
Dependencies
During setup, we told Spring Initializr to add the Spring Boot DevTools and
Spring Web dependencies. You can see these dependencies, along with a starting
test framework in the pom.xml file created for your project:
<dependencies>
    <dependency>
        <groupId>org.springframework.boot</groupId>
        <artifactId>spring-boot-starter-web</artifactId>
    </dependency>
    <dependency>
        <groupId>org.springframework.boot</groupId>
        <artifactId>spring-boot-devtools</artifactId>
        <scope>runtime</scope>
        <optional>true</optional>
    </dependency>
    <dependency>
        <groupId>org.springframework.boot</groupId>
        <artifactId>spring-boot-starter-test</artifactId>
        <scope>test</scope>
        <exclusions>
            <exclusion>
                <groupId>org.junit.vintage</groupId>
                <artifactId>junit-vintage-engine</artifactId>
            </exclusion>
        </exclusions>
    </dependency>
</dependencies>
Spring Boot DevTools
Spring Boot DevTools provides some opinionated configuration and tooling that
can make the development experience a little better. First, DevTools sets some
default properties for Spring libraries to disable caching during local
development, and to log web requests at the DEBUG logging level. The full set
of property defaults configured by DevTools is available on
Github
Most dynamic programming languages provide a live reload development environment that automatically updates the code running on the server whenever code changes in the file system. DevTools provides this functionality by restarting the application server any time the classpath is modified. This restart can be combined withDevTools a browser refresh whenever a file is changed. You can install the LiveReload browser extensions to have the browser automatically refresh after any changes are detected.
Spring Web
The Spring Web dependencies is a container for a few different libraries that aid in web development. Specifically, Spring Web uses Spring MVC as a model-view-controller pattern, Jackson for JSON processing, and an embedded Tomcat server, along with the required configuration for servlet handling, error pages, and bundling your application as a WAR file for deployment to the Tomcat servlet container.
SpringApplication
In addition to setting up the required dependencies, Spring Initializr created a
default Application based on your configuration. In my case, this file was
called DemoApplication with the sole job of running your Spring app.
package com.sookocheff.springdemo;

import org.springframework.boot.SpringApplication;
import org.springframework.boot.autoconfigure.SpringBootApplication;

@SpringBootApplication
public class DemoApplication {

	public static void main(String[] args) {
		SpringApplication.run(DemoApplication.class, args);
	}

}
Within the public static void main method, we have a single line:
SpringApplication.run. The SpringApplication class provides a convenient way
to bootstrap a Spring application that is started from a main() method using the
static run method.
The @SpringBootApplication annotation on your main class enables some of
Spring Boot’s opinionated parts. This annotation, is actually just a combination
of three annotations:
@Configuration: Allows us to import additional configuration classes and beans.@EnableAutoConfiguration: Automatically configures your application based on the chosen dependencies.@ComponentScan: Automatically register Beans and Components to be managed by Spring’s IoC container. If you are not familiar with Spring Bean’s, consult this tutorial.
Structuring the rest of your application
Spring Initializr created a default main class. To add to this application, you
keep the main class as the root of your project and add packages and classes as
subdirectories of this main application. With this structure, the
@SpringBootApplication in the main class defines a base package to search for
additional Spring components using the @ComponentScan annotation.
To continue building your example, the recommended application structure looks something like this:
com
 +- sookocheff
    +- DemoApplication.java
    |
    +- customer
    |   +- Customer.java
    |   +- CustomerController.java
    |   +- CustomerService.java
    |   +- CustomerRepository.java
    |
    +- order
        +- Order.java
        +- OrderController.java
        +- OrderService.java
        +- OrderRepository.java
Part 3: A Simple Web Service
Now that we have a project setup and integrated with VS Code, we can create a
simple web service. To do this, we will create simple REST endpoint that returns
a JSON payload representing a
player. The
basic data model is defined in a simple Player class:
package com.sookocheff.springdemo.player;

public class Player {

    private final String playerId;
    private final String alias;
    private final String displayName;

    public Player(final String id,
                  final String alias,
                  final String displayName) {
        this.playerId = id;
        this.alias = alias;
        this.displayName = displayName;
    }

    public String getPlayerId() {
        return playerId;
    }

    public String getAlias() {
        return alias;
    }

    public String getDisplayName() {
        return displayName;
    }
}
With this basic data model in place, we can serve requests. The Spring Web
dependency adds the Spring MVC library implementing our model-view-controller
pattern for handling web requests. HTTP requests are handled by a controller
identified by the @RestController annotation, and individual URLs are handled
with the @GetMapping annotation.
package com.sookocheff.springdemo.player;

import org.springframework.web.bind.annotation.GetMapping;
import org.springframework.web.bind.annotation.RequestParam;
import org.springframework.web.bind.annotation.RestController;

@RestController
public class PlayerController {

    @GetMapping("/player")
    public Player getPlayer(@RequestParam(value = "playerId", defaultValue = "12345") final String playerId) {
        return new Player(playerId, "soofaloofa", "Kevin Sookocheff");
    }
}
This simple application can be run using the Spring Dashboard or run
configuration. Navigate to localhost:8080/player to view the simple response.
What magic happened here?
Navigating to the /player URL provides a fully serialized JSON response for the
basic Player class we defined. How did this happen? Spring Boot works by looking
at the classpath of your project and at any of the beans or components you have
configured and connects those pieces together into a working application.
When we use the @SpringBootApplication we transitively add the
@EnableAutoConfiguration. The @EnableAutoConfiguration annotation tells
Spring Boot to “guess” how you will want to configure Spring, based on our
dependencies. For example, our project includes Spring MVC on the classpath
because it was included as part of the spring-boot-starter-web dependency.
Once Spring Boot sees this dependency on the classpath, it adds the proper
configuration to your application to setup Spring Web MVC with sane defaults.
The Spring Web MVC framework is designed around a DispatcherServlet that
handles all the HTTP requests and responses. Spring Web MVC also requires a
WebApplicationContext that tracks the instantiation of controllers and
handlers. In a traditional Spring application, these components are configured
using XML.
What Spring Boot does for us is convert the XML-based configuration of a
traditional Spring app with code-based annotations and sane defaults. If, at any
time, you want to make changes to the sane defaults you can tell Spring Boot to
not auto-configure a certain component by using an exclude parameter to the
@SpringBootApplication annotation. The full list of auto configuration and how
it works is available in the Spring Boot reference
documentation
Where to go next?
Spring Boot (and Spring) is a big project, and it is hard to understand something of this scope in a single afternoon. If you want to learn more, the reference documentation for both Spring and Spring Boot are excellent resources.