Java was the first programming language I was taught at University, and the language I used for the first decade of my career. It continues to be a reliable companion throughout my software development career. Unfortunately, not having developed with Java professionally for several years, I’ve found there are many aspects of the modern Java language that I’m simply not familiar with. To rectify this, I’ve collected the major improvements to the language beginning with Java 8, combined with a short explanation of how they work and how to use them. It assumes you know Java, but don’t really know Java. Hopefully, it can take you from experienced beginner to just plain experienced again.
Table of Contents
- Lamda Expressions
- Streams
- Optional
- Collection Factories
- Date and Time API
- Default Methods
- CompletableFuture
- Reactive Programming with the Flow API
- Java Module System
- Local Variable Type Inference with var
- Switch Expressions
- Text Blocks and Multi Line Strings
- Record Classes
- Pattern Matching
- Sealed Classes
- jwebserver
1 Lambda Expressions
Lambdas
Lambdas provide a concise shorthand for behaviour parameterization allowing you to pass executable code to a function that will be executed at a later point in time. Prior to Java 8, we used anonymous classes for this purpose, but anonymous classes are a somewhat unsatisfying solution. Technically speaking, lambdas in Java don’t actually let you do anything you couldn’t do before, but they vastly simplify the code and interface for passing code to methods.
For example, the following code uses an implementation of the Comparator
interface to compare two students by their GPA.
Comparator<Student> byGpa = new Comparator<Student>() {
    public int compare(Student s1, Student s2){
        return s1.getGradePointAverage().compareTo(s2.getGradePointAverage());
    }
};
With lambda expressions, this code can be simplified by removing the need for
implementing a class and the compare method.
Comparator<Student> byGpa =
    (Student s1, Student s2) -> s1.getGradePointAverage().compareTo(s2.getGradePointAverage());
Functional Interfaces
Lambdas can be used wherever a functional interface is expected. In Java, a language not known to be functional, a functional interface means an interface with exactly one abstract method.
For example, consider the
Runnable
interface that should be implemented by any class that intends to have
instances executed by a thread. To implement the interface correctly, the
class must define a single method of no arguments called run.
public interface Runnable {
  void run();
}
The Runnable interface is a functional interface, and lambda expressions
can be used to provide the implementation. They do this by treating the
lambda expression as the implementation of the abstract method defined by
the functional interface. The following example shows an implementation of
the Runnable interface using a lambda expression. The lambda expression
is treated as the concrete implementation of the single abstract method
defined by the interface.

For convenience, interfaces that specify a single abstract method can be
marked with the @FunctionalInterface annotation. This annotation is
useful for documentation, and the compiler will report an error if you try
and mark an interface as functional that doesn’t match the “only one
abstract method” requirement. The annotation isn’t mandatory, but is best
practice to include it.
Lambda Syntax
The simplest lambda expression is a single parameter followed by an expression.
parameter -> expression
If you have more than one parameter, you can wrap them in parenthesis.
(parameter1, parameter2) -> expression
In the previous code blocks, the expression is immediately evaluated and
the value is returned. This means that expressions cannot contain
variables or control flow statements. To do something more complex you can
define a lambda with a code block wrapped in curly braces instead of an
expression. If the lambda expression needs to return a value, then the
code block should include a return statement.
(parameter1, parameter2) -> { code block }
Using Lambda Expressions
Lambda expressions can be used wherever functional interface is expected, and we now know some of the syntax required to implement them. Let’s walk through a few examples of using them to get a sense for how they work.
Consumer
The Consumer<T> interface is a functional interface with a single
abstract method accept that performs an operation on the input item. The
interface is implemented like this.
@FunctionalInterface
public interface Consumer<T> {

  /**
   * Performs this operation on the given argument.
   *
   * @param t the input argument
   */
  void accept(T t);
}
Anything implementing Iterable includes a default method forEach that
takes as a parameter an action of the type Consumer<T>. Because this
interface is functional, we can use lambda expressions to satisfy this
parameter. The following code block defines a simple list and uses an
expression to simply print out each element.
ArrayList<Integer> numbers = new ArrayList<Integer>();
// add numbers to array
numbers.forEach( n -> System.out.println(n));
We can also define this lambda using code blocks and an explicit return statement.
ArrayList<Integer> numbers = new ArrayList<Integer>();
// add numbers to array
numbers.forEach( n -> { return System.out.println(n); });
Predicate
The Predicate<T> interface defines a single method test that accepts
an input parameter and returns true or false.
@FunctionalInterface
public interface Predicate<T> {

  /**
   * Evaluates this predicate on the given argument.
   *
   * @param t the input argument
   * @return {@code true} if the input argument matches the predicate,
   * otherwise {@code false}
   */
  boolean test(T t);
}
The Predicate<T> interface is used by the filter function of the
Stream<T> interface to remove elements from a list that don’t belong
(i.e. that return false when tested).
Stream<Integer> positiveNumbers = numbers.stream().filter(n -> n > 0);
EventHandler
A common pattern in GUI development is to write your logic using callbacks that respond to user input. For example, when a user clicks on a button, the GUI framework calls some function code you have implemented to respond to the input. This pattern is a natural fit for lambda expressions.
In JavaFX, the EventHandler interface is a functional interface defined
for this callback purpose. The interface contains a single method handle
accepting a parameter for the event to respond to.
@FunctionalInterface
public interface EventHandler<T extends Event> extends EventListener {
  void handle(T event);
}
The interface can be implemented using a lambda to respond to GUI events.
ToggleButton button = new ToggleButton("Click");
final StringProperty btnText = button.textProperty();
button.setOnAction((event) -> {    // lambda expression
   ToggleButton source = (ToggleButton) event.getSource();
   if(source.isSelected()) {
      btnText.set("Clicked!");
   } else {
      btnText.set("Click!");
   }
});
Method References
Method references are a close cousin to lambda expressions that allow you to pass existing method definitions to functions as if they were defined as lambdas.
To create a method reference use the <class>::<method> syntax, where
<class> is the target class where the method you wish to reference
exists and <method> is the method your wish to reference from the class.
As a concrete example, consider the simple getName() method of
a fictional Student class.
public class Student {
  private String name;

  public String getName() {
    return name;
  }
A method reference to the getName method is simply Student::getName.
Functionally, Student::getName is equivalent to (Student s) -> s.getName(). The method reference or the lambda can be used
interchangeably — it is typically a matter of preference and readability
when deciding which one to use.
2 Streams
Stream Basics
Streams are an update to the Java API that let you interact with collections of data declaratively.
When using streams, you state what you want to achieve, as opposed to specifying how to implement an operation. Another way to think about this approach is that the iteration model is decoupled from the implementation — with streams, iteration is handled by the compiler, and the programmer focuses on the logic.
Another benefit of streams is the ability to chain together several building-block operations to express complicated data-processing pipelines while keeping your code readable and its intention clear.
The best way to get started using a stream is with an existing collection.
We start our discussion of streams with collections, because that’s the simplest way to begin working with streams. Collections in Java 8 support a new stream method that returns a stream. But what exactly is a stream?
A short definition from the book “Modern Java in Action” is “a sequence of elements from a source that supports data-processing operations.” Let’s break down this definition step-by-step:
- Sequence of elements— Like a collection, a stream provides an interface to a sequenced set of values of a specific element type. Because collections are data structures, they’re mostly about storing and accessing elements with specific time/space complexities (for example, an ArrayList versus a LinkedList). But streams are about expressing computations such as filter, sorted, and map, which you saw earlier. Collections are about data; streams are about computations.
- Source— Streams consume from a data-providing source such as collections, arrays, or I/O resources. Note that generating a stream from an ordered collection preserves the ordering. The elements of a stream coming from a list will have the same order as the list.
- Data-processing operations— Streams support database-like operations and common operations from functional programming languages to manipulate data, such as filter, map, reduce, find, match, sort, and so on. Stream operations can be executed either sequentially or in parallel.
Modern Java in Action
The Streams API
The Streams API introduced in Java 8 and extended in Java 9 provides an extensive set of built-in operations allowing you to declaratively express fairly complex data processing operations. This article looks at how to use the Streams API to address some of the most common operations you might come across.
Use Case: Filtering
One common case when working with collections of data is selecting
a subset of elements. Two ways to do this with the Streams API is by using
filter and distinct
filter
Stream<T> filter(Predicate<? super T> predicate);
The Stream interface supports this through the
filter method. filter takes a single parameter, the predicate, which
is a function that returns a boolean value, and it returns a Stream that
includes all elements that the predicate evaluates as true, removing
elements that evaluate as false. Because Predicate is a functional
interface, you can also pass a lambda expression as the predicate
parameter.
For example, the following block of code filters a list of Products
to only include those priced greater than $3000 using a lambda expression.
class Product {
  int id;
  String name;
  float price;

  public Product(int id, String name, float price) {
    this.id = id;
    this.name = name;
    this.price = price;
  }
}

public class StreamExample {
  public static void main(String[] args) {
    List<Product> productsList = new ArrayList<>();
    productsList.add(new Product(1, "HP Laptop", 2500f));
    productsList.add(new Product(2, "Dell Laptop", 3000f));
    productsList.add(new Product(3, "Lenevo Laptop", 2800f));
    productsList.add(new Product(4, "Sony Laptop", 2800f));
    productsList.add(new Product(5, "Apple Laptop", 5000f));

    List<Product> expensiveProducts =
        productsList.stream()
            .filter(p -> p.price > 3000) // filtering by price
            .collect(toList());
}
distinct
Stream<T> distinct();
distinct that is closely related to filter but returns a stream with
unique elements only. Uniqueness is judged by the implementation of
equals and hashcode methods of the objects in the stream. For example,
the following code filters all even numbers from a list and then
eliminates duplicates.
List<Integer> numbers = Arrays.asList(1, 2, 1, 3, 3, 2, 4);
numbers.stream()
   .filter(i -> i % 2 == 0) // filter event numbers
   .distinct() // return only unique numbers
   .collect(toList());
Use Case: Slicing
Another common use case is to extract subsets of a list.
takeWhile
Stream<T> takeWhile(Predicate<? super T> predicate);
takeWhile allows you to create a slice of a stream by a taking elements
until one is found that does not match predicate. For example, the
following block of code creates a stream of integers, and takes from that
stream until it finds an integer greater than or equal to 4 and
predicate returns false.
Stream.of(1,2,3,4,5,6,7,8,9,10,9,8,7,6,5,4,3,2,1)
    .takeWhile(i -> i < 4 )
    .forEach(System.out::print);

// prints 123
Contrast this with filter. Given the same stream, filter will return all
elements matching predicate.
Stream.of(1,2,3,4,5,6,7,8,9,10,9,8,7,6,5,4,3,2,1)
    .filter(i -> i < 4 )
    .forEach(System.out::print);
// prints 123321
dropWhile
Stream<T> dropWhile(Predicate<? super T> predicate);
dropWhile is the complement of takeWhile. It throws away the elements
at the start where the predicate is false. Once the predicate evaluates to
true it stops and returns everything that remains. For example, the
following code removes elements from the beginning of the list that do not
match the predicate.
Stream.of(1,2,3,4,5)
    .dropWhile(i -> i < 4 )
    .forEach(System.out::print);

// prints 45
limit
Stream<T> limit(long maxSize);
limit(n) returns a stream that is truncated to the size n. It simply
returns the first n elements the order they are encountered. For
example, we can take a previous filter operation and restrict it to only
return two elements.
Stream.of(1,2,3,4,5,6,7,8,9,10,9,8,7,6,5,4,3,2,1)
    .filter(i -> i < 4 )
    .limit(2)
    .forEach(System.out::print);

    // prints 12
skip
Stream<T> skip(long n);
The skip(n) method is an intermediate operation that discards the first
n elements of a stream. It is a nice complement to limit. For example,
the following block of code filters all even numbers, but uses skip to
skip the first two.
Stream.of(1, 2, 3, 4, 5, 6, 7, 8, 9, 10)
    .filter(i -> i % 2 == 0)
    .skip(2)
    .forEach(System.out::print);

    // prints 6810
Use Case: Mapping
A common theme in data processing is to select information or apply a function to certain elements of the data. The Streams API provides these idioms through the map and flatMap methods.
map
<R> Stream<R> map(Function<? super T, ? extends R> mapper);
map applies a function to each element of a stream and returns the
result to create a new stream. map takes a single parameter mapper
that is a functional interface of type Function.
@FunctionalInterface
public interface Function<T, R> {
    R apply(T t);
The Function interface contains a single method apply that takes an
element of type T and returns an element of type R. The most direct
way to think of this interface is to relate it to math. The function $$
f(x) = y $$ is a function that takes an argument $$ x $$ and returns
a result $$ y $$.
As a concrete example, we can take a stream of String and calculate the
length of each of them by applying the String.length function on each:
List<String> words =
    Arrays.asList("Java", "For", "People", "Who", "Forgot", "They", "Knew", "Java");

List<Integer> wordLengths = words.stream()
    .map(String::length)
    .collect(toList());

System.out.println(wordLengths);

// prints [4, 3, 6, 3, 6, 4, 4, 4]
flatMap
<R> Stream<R> flatMap(Function<? super T, ? extends Stream<? extends R>> mapper);
The flatMap operation is similar to map. However, flatMap flattens
streams in addition to mapping the elements in those streams. It replaces
each value of a stream with another stream and then concatenates all the
generated streams into a single stream. That is a mouthful!! A simple
example can help. More generally, flatmapping refers to the process of
taking a nested collection and flattening it into a single collection:
List of lists: [[1, 2, 3], [4, 5, 6, 7]]
Flattened list: [1, 2, 3, 4, 5, 6, 7]
Let’s break this down a little by first looking at the mapper parameter.
It’s type signature is Function<? super T, ? extends Stream<? extends R>> mapper which reads as a Function of two types: T and Stream<R>.
Returning to our math example, the flatMap method takes
a function similar to map, $$ f(x) = y $$. The difference in this case is
that the return value $$ y $$ is a stream, and not a singular value.
Lastly, flatMap returns a Stream<R>. If our mapper parameter creates
a Stream<R> with each invocation, our stream would look something like
[Stream<R>, Stream<R>, Stream<R>]. What flatMap does is concatenate
these results together to return a single stream.
At this point, an example is in order. Let’s start simply. Consider the case where our input is a list of lists:
List<List<String>> list = Arrays.asList(
  Arrays.asList("a"),
  Arrays.asList("b"));
System.out.println(list);
// prints [[a], [b]]
Now, for each element of this list, we run the map function to create an
underlying stream for each sub list. This returns an object of type
Stream.
System.out.println(list
    .stream()
    .map(Collection::stream)
    .collect(toList()));
// prints [java.util.stream.ReferencePipeline$Head@2af004b, java.util.stream.ReferencePipeline$Head@248e319b]
We can use flatMap to concatenate these streams together to get a final
result that strips the wrapping Stream from the previous version.
System.out.println(list
  .stream()
  .flatMap(Collection::stream)
  .collect(toList()));
// prints [a, b]
As a more practical example, lets look at how you might create pairs of
integers from two different streams. You could use two map operations to iterate on
the two lists and then generate the pairs. Unfortunately, this would return
a Stream<Stream<Integer[]>>. What you need to do is flatten the generated
streams to return Stream<Integer[]>:
List<Integer> numbers1 = Arrays.asList(1, 2, 3);
List<Integer> numbers2 = Arrays.asList(3, 4);
List<int[]> pairs =
    numbers1.stream()
        .flatMap(i -> numbers2.stream().map(j -> new int[] {i, j}))
        .collect(toList());
Use Case: Matching
The matching use case determines if any items in a collection match a certain condition.
anyMatch
boolean anyMatch(Predicate<? super T> predicate);
anyMatch returns true if any item in the stream matches the
predicate. anyMatch will return as soon as it finds an item matching
the predicate condition and so it may not traverse all items in the
list.
The following block of code checks if we have any students whose name
starts with “D” using anyMatch.
List<Student> list = new ArrayList<>();
list.add(new Student("Daniel LaRusso", 3.8, 12));
list.add(new Student("Johnny Lawrence", 1.4, 13));

boolean result = list.stream()
    .anyMatch(s -> s.getName().startsWith("D"));

assertTrue(result);
allMatch
boolean allMatch(Predicate<? super T> predicate);
allMatch returns true if all items in the stream match the
predicate. allMatch will evaluate each item in the stream against the
predicate, returning false if it encounters an item that doesn’t match.
If it gets to the end of the stream without encountering a false match, it
will return true.
We can use the same code example as before, but this time it evaluates to false because not all student names begin with the later “D”.
List<Student> list = new ArrayList<>();
list.add(new Student("Daniel LaRusso", 3.8, 12));
list.add(new Student("Johnny Lawrence", 1.4, 13));

boolean result = list.stream()
    .allMatch(s -> s.getName().startsWith("D"));

assertFalse(result);
noneMatch
boolean noneMatch(Predicate<? super T> predicate);
noneMatch is the complement to allMatch, returning false if all
items in the stream do not match the predicate.
Replacing allMatch with noneMatch in our previous example still
returns false because we do have at least one student whose name starts
with letter “D”.
List<Student> list = new ArrayList<>();
list.add(new Student("Daniel LaRusso", 3.8, 12));
list.add(new Student("Johnny Lawrence", 1.4, 13));

boolean result = list.stream()
    .noneMatch(s -> s.getName().startsWith("D"));

assertFalse(result);
Use Case: Finding
Another common data algorithm for working with collections of data is to find and return elements that match a certain condition. Each of these operations are fairly straightforward.
findFirst
Optional<T> findFirst();
findFirst simply returns the first item from the stream. stream. We use
this method when we specifically want the first element from a sequence.
The following block of code returns “A”.
The return type is Optional, which will not contain a result if the
input stream is empty.
List<String> list = Arrays.asList("A","B","C","D");

Optional<String> result = list.stream().findFirst();
findAny
Optional<T> findAny();
The findAny operation returns an arbitrary item out of the current
stream. Usually, findAny will return the first element, but if we are
performing a operation or if the compiler makes certain optimizations,
there is no guarantee which element will be returned.
The following block of code may return any one of “A”, “B”, “C”, or “D”.
List<String> list = Arrays.asList("A","B","C","D");

Optional<String> result = list.stream().findAny();
Use Case: Reducing
Reducing repeatedly combines all of the elements in the stream to produce a single value result.
reduce
T reduce(T identity, BinaryOperator<T> accumulator);
reduce takes two arguments. The first is an initial value, and the second
a BinaryOperator<T> that combines two elements to produce a new value.
The canonical example of reduce is computing the sum of a list of
integers.
int sum = numbers.stream().reduce(0, (a, b) -> a + b);
Conceptually, this works by successfully adding elements in our stream.
Given a list [1, 2, 3, 4, 5] the reduce operation for summing our list
can be visualized as:
0 + (1 + (2 + (3 + (4 + 5))))
Because of the generalized nature of reduce, we can easily adapt our sum
operation to calculate a product by altering our initial condition and
operator.
int product = numbers.stream().reduce(1, (a, b) -> a * b);
This can be visualized as:
1 * (1 * (2 * (3 * (4 * 5))))
Primitive Streams
Streams are great, but the come at a slight cost when dealing with
primitive types. Namely, since the streams API deals with generic objects, when we use it
with primitives such as integers or doubles we suffer unnecessary boxing
and unboxing costs. Because of this, the Streams API provides a few
interfaces specialized for dealing with primitive types: IntStream,
DoubleStream, and LongStream.
Each of these interfaces include a few new methods for performing common
numeric operations like sum and max that would otherwise be
implemented using reduce.
To convert a stream into a primitive equivalent, use the mapTo family of
functions. The following block of code uses getGradePointAverage to
return a Double, and the mapToDouble method returns a Stream<Double>
result. With this in hand, we can call the simple sum() function to
gather our results.
students.stream()
  .mapToDouble(Student::getGradePointAverage)
  .sum();
To convert a primitive stream back to a generic stream, use the boxed()
method:
students.stream()
  .mapToDouble(Student::getGradePointAverage)
  .boxed(); // Converts from primitive stream to object stream
Creating Streams
So far, we’ve created streams using the stream() method on a related
Collection. The Streams API provides a few additional builders that are
useful for creating new stream instances.
Stream.of
If you have values, you can create a stream directly from them.
Stream<String> stream = Stream.of("Java ", "For", "The", "Experienced", "Beginner");
Collectors
The collect method is a terminal operation on a stream. We’ve used it
already to convert a stream to a List to output the result of our stream
pipeline.
There are many more ways to collect stream output than just a simple list.
In fact, the collect interface takes a Collector as a parameter, and
any implementation of this interface can be used to create the output you
desire.
The Collectors API provides a number of built-in collectors that operate
over streams we can take advantage of.
Use Case: Summarizing
Many of the collectors satisfy a similar use case as the reduce function
to summarize data while providing a simplified API.
counting is a simple collector that counts the number of elements
in the stream.
students.stream().collect(Collectors.counting());
You can use two collectors, Collectors.maxBy and Collectors.minBy to
calculate the maximum or minimum in a stream. These functions require
a Comparator that defines how to decide which element is greater than
the other.
students.stream()
    .collect(
      Collectors.maxBy(Comparator.comparingDouble(Student::getGradePointAverage)));
summingInt, summingDouble, summingLong, and their related functions
averageInt, averageDouble, and averageLong do exactly what they say
on the tin: calculate the sum or average of the stream.
double averageGpa =
    students.stream().collect(Collectors.averageDouble(Student::getGradePointAverage));
Collectors also provides a convenience function to calculate sums, counts,
averages, and more with one operation. These functions are
summarizingInt, summarizingDouble, and summarizingLong. They return
a data structure holding the summary data computed for the stream.
DoubleSummaryStatistics stats =
    students.stream().collect(Collectors.summarizingDouble(Student::getGradePointAverage));
The joining function uses StringBuilder internally to append together
each element of a Stream<String> and return the result as a single
String. The joining function is overloaded to optionally take
a separator that is used between elements of the joined stream.
String allNames =
    students.stream().map(Student::getName).collect(Collectors.joining(", "));
reducing is a generalized collector that runs user-defined reduce
operations on the stream. You can often achieve what you want using the
reduce intermediate operation or the reducing collector. The main
difference between the two is that reduce is an immutable function
whereas the reducing collector modifies a container that collects the
result. This can become important if you want to run a parallel operation
on a stream.
Use Case: Grouping
If you are familiar with SQL, you have likely used grouping operations to group results into a set based on certain properties.
The first method of grouping is using the groupingBy function. To make
grouping work correctly, you pass groupingBy a function that returns the
key you wish to group by. The return value of groupingBy is a map
between the key we use for grouping and the resulting list of elements
that matches the grouping key. As an example, you can group all students
by the grade they are in using the following block of code.
Map<Student.Grade, List<Student>> studentsByGrade = students.stream()
  .collect(Collectors.groupingBy(Student::getGrade))
What if we want to continue processing each group of elements? We can use
the filtering, or mapping functions in conjunction with our grouping
to accomplish this. The following example groups the set of students by
their grade, and in addition extracts the name of each student.
Map<Grade, List<String>> studentsByGrade = students.stream()
      .collect(groupingBy(Student::getGrade, mapping(Student::getName, toList())));
This example used the overloaded groupingBy call that accepts a grouping
and a downstream operation. We can also use this to perform a two-level
grouping. This is done by passing a second groupingBy call defining
second way to classify the items of a stream. In fact, you can pass any
form of collector such as counting or summing to the second parameter
of a groupingBy to continue processing the grouped elements.
Use Case: Partitioning
Partitioning is similar to grouping, but uses a predicate value called
a partitioning function as a way of classifying items into groups. Since
the partitioning function is a predicate, it splits the input elements
into two groups: one for the true case and another for the false case.
The following example partitions a stream of integers into lists: one of elements greater than three and one of elements less than three.
Stream<Integer> s = Stream.of(1, 2, 3, 4, 5, 6, 7, 8, 9, 10);

Map<Boolean, List<Integer>>
    map = s.collect(
        Collectors.partitioningBy(num -> num > 3));
Parallel Streams
Before Java 7, processing a collection of data in parallel was extremely cumbersome (if you ever have to do it, Java Concurrency in Practice is your friend). Because the Streams API takes iteration out of your hands and gives that task to the compiler, it makes executing operations in parallel on a collection of data easy.
To turn a collection into a parallel stream, invoke the parallelStream
method on the collection. The following block of code does just that, and
prints the current thread number for each value that is iterated over.
List<Integer> listOfNumbers = Arrays.asList(1, 2, 3, 4);
listOfNumbers.parallelStream().forEach(number ->
    System.out.println(number + " " + Thread.currentThread().getName())
);
Running this code, you might get something like this back (the results will vary depending on your setup). In my case, number 3 is processed first by the main thread, then numbers 4 and 2 by threads forked by the Streams API. Lastly, the first element, number 1, gets processed by the main thread.
3 main
4 ForkJoinPool.commonPool-worker-2
2 ForkJoinPool.commonPool-worker-1
1 main
In addition to the parallelStream method, you can convert a stream from
parallel to sequential and back using the parallel and sequential
methods.
stream.parallel()
          .filter(...)
          .sequential()
          .map(...)
          .parallel()
          .reduce();
Something to be aware of when using parallel streams is that any code executed during stream iteration cannot mutate any state (because that state would be shared between the threads of the parallel stream)..
You may be thinking, “If parallel streams are so simple to use, why don’t we make every stream parallel?” Although on the surface this seems like a good idea, in practice, it is not so easy. Some stream operations are simply more parallelizable than others. Whenever you invoke parallelization, the implementation needs to partition the stream, then assign an operation for substream to a different thread, and then finally combine the results of these different threads into a single return value.
It’s difficult to predict exactly the conditions that make parallel streams more performant than their sequential counterparts. One simple model that can help is the so-called $$ NQ $$. Here, $$ N $$ stands for the number of elements in the stream, and $$ Q $$ stands for the amount of computation done per element. The larger the product of $$ N \times Q $$, the more likely parallelization will improve performance.
3 Optional
Encountering a NullPointerException is a way of life for any Java
developer. Unfortunately, the vast majority of these errors pop up at the
worst possible time — during runtime. The Optional type was added to
Java 8 to make explicit the case where a value does not exist. When an
object is declared as Optional, you can no longer forget to check
for null and wind up with a NullPointerException at the worst possible
time. With Optional<T> checking for null cases is enforced by the type
system and any errors will be surfaced at compile time.
So what is Optional. Conceptually, it is fairly straightforward — it
models the case where a value may or may not exist. When a value is
present, the Optional class wraps it under a get method. When a value is
not presence, it is model with an empty optional created by
Optional.empty, and attempting to call get on an empty Optional will
throw an error.
You may wonder about the difference between a null reference and
Optional.empty(). They seem very similar and trying to reference either
will cause an exception: either NullPointerException for the null case
or NoSuchElementException for the Optional case. The difference is
that an empty Optional is a valid and usable typed object. By using
Optional consistently, we create a clear distinction between a value
that is missing but was supposed to be there and a value that is absent
because of a bug or a data problem.
Creating Optionals
You can create Optionals in a few ways:
Optional.empty()  // with no value
Optional.of(object) // from an existing object
Optional.ofNullable(object) // from an existing object that may be null
Using Optionals
Optional.get
There are a number of different ways to unwrap an optional to get to the value inside.
The first, Optional.get is very similar to checking for null. If the
value is absent, the code throws a NoSuchElementException. This use case
doesn’t provide much additional benefit compared to checking for null, so
in most cases it pays to look at other ways to access your value that take
better advantage of the Optional data type.
String value = Optional.get();
orElse, orElseGet, or and orElseThrow
These methods have the following type signatures.
public T orElse(T other)

public T orElseGet(Supplier<? extends T> other)

public Optional<T> or(Supplier<? extends Optional<? extends T>> supplier)

public <X extends Throwable> T orElseThrow(Supplier<? extends X> exceptionSupplier) throws X
orElse takes a parameter of the same type as the Optional. When called,
it returns the value in the Optional if it is present, otherwise it
returns other. This construct is useful for the case of returning
a default value if is not provided.
String name = Optional.of(user.firstName)
  .orElse("Anonymous");
orElseGet takes a Supplier of the same type as the Optional.
Supplier is a simple functional interface that has a sole method
get returns an object of the specified type.
String name = Optional.of(user.firstName)
  .orElse(() -> getDefaultName();
The difference is subtle, but it can be significant.
orElsewill always call the given function whether you want it or not, regardless of Optional.isPresent() valueorElseGetwill only call the given function when the Optional.isPresent() == false
For example, the following block of code creates a new object when the
optional is empty. Using orElse we create a new object no matter if the
optional is present or empty, whereas using orElseGet acts lazily; the
new function is called only if the optional is empty.
Optional<Foo> opt = ...
Foo x = opt.orElse( new Foo() ); // creates a Foo instance no matter what
Foo y = opt.orElseGet( Foo::new ); // creates a Foo instance only if opt is empty
or is very similar to orElseGet, but it explicitly returns another
Optional.
Optional<String> name = Optional.of(user.firstName)
  .or(Optional.of("Anonymous"));
orElseThrow is equally familiar once you’ve covered the basics presented here.
Optional<String> name = Optional.of(user.firstName)
  .or(Optional.of("Anonymous"));
Two additional ormethods come in the form of theseThe or methods
Optional<String> name = Optional.of(user.firstName)
  .orElseThrow(IllegalArgumentException::new)));
ifPresent and ifPresentOrElse
Optional.ifPresent(Consumer<? extends T> consumer)
Optional.ifPresentOrElse(Consumer<? extends T> action, Runnable emptyAction)
executes consumer if optional is present executes action if present or empty action if not present
Optionals as Streams
Beginning with JDK 9, Optionals can be treated much like the streams API
using Optional.map, Optional.flatMap, and Optional.filter. You can
also convert an Optional<T> to a Stream<Optional<T>> with the
Optional.stream method.
These methods can simplify and remove a lot of code for checking if an Optional
has a value. For example, the following code block isn’t much different
than checking for null before executing code:
Optional<Student> student = ...;

String name = null;
if (student.isPresent()) {
  name = student.get().getName();
  // do something
} else {
  name = "Anonymous";
}
It can be replaced with map to apply the specified function to the
Optional if a value exists. Nested Optionals can be handled with
flatMap.
String name = student.map(Student::getName).orElse("Anonymous");
Optional.stream returns a stream with optional values that have been
set. This method unwraps optionals and returns a stream of the underlying
values. For example,
Stream<Optional<String>> stream = ...
Set<String> result = stream.flatMap(Optional::stream)
                           .collect(toSet());
4 Collection Factories
Prior to Java 9, it was fairly tedious to create a small collection of elements, leading to code like the following from Modern Java in Action to create an immutable set of friends.
Set<String> friends =
  new HashSet<>(Arrays.asList("Raphael", "Olivia", Thibaut"));
Now, you can use newly added factory methods that support creating small immutable collections.
List<String> friends = List.of("Raphael", "Olivia", "Thibaut");
or
Set<String> friends = Set.of("Raphael", "Olivia", "Thibaut");
The factory methods added to the Collection API simplify creating
simple collections.
5 Date and Time API
tldr; Use java.time! It provides thread safe, time-zone friendly dates
and times with an easy to use API.
Java’s Date and Time APIs have been a historic weak spot in the language
library. Prior to Java 8, most developers have used
Joda-Time as the de facto date and time
library. With the Java 8 release, the ideas and features in Joda-Time have
been migrated into the Java core library under the java.time package.
All of this means, in modern Java projects you should use java.time and
forget about anything in java.util.date and java.util.calendar.
Rather than restate the API documentation you can find elsewhere, I will link out to the official documentation
6 Default Methods
Prior to Java 8, Any concrete implementation of an interface must provide an implementation for each method defined by the interface. The biggest problem this causes is when the author of an interface or library want to update an interface; whenever a new method is added to the interface, any existing concrete implementation will need to implement the new method. To help fix this problem, Java 8 introduced default methods that allow you to provide a default implementation of interface methods. In other words, interfaces can now provide a concrete implementation for methods.
With this change, any class implementing an interface automatically
inherits any default implementations if they don’t provide one explicitly.
In fact, Java 8 introduced some changes to the Collections API that
include new methods like stream. Without a default method, any existing
library authors who depend on Collections would need to implement these
methods when upgrading to Java 8. With a default method, the addition of
the stream method is transparent:
To mark a method as a default method, you use the default modifier. For
example, the stream method is marked as default and any implementing
classes will use this method for as long as it is not overridden.
default Stream<E> stream() {
    return StreamSupport.stream(spliterator(), false);
}
Default methods make interfaces behave similar to abstract classes. So what is the difference? First, a class can only extend from one abstract class, while a class can implement multiple interfaces. Second, an abstract class can reference instance variables, while an interface can’t have instance variables.
Although quite rare in practice, it is now possible for a class to inherit more than one method implementation with the same signature. In this case, which method is used? There are three rules for method resolution that apply:
- Classes first. If a method is declared in a class (or superclass), that implementation takes priority over an interface’s default method.
- Subinterfaces second. If no class takes priority, the method with the same signature in the most specific interface is selected. For example, if B extends A, B is more specific than A and the method signature in B is chosen.
- Explicit last. If neither of the two previous cases resolves the issue, the class inheriting from multiple interfaces has to explicitly override the default implementation. It can then call the desired default method it wishes to use explicitly.
7 CompletableFuture
Java 8 introduced the CompletableFuture implementation of the Future
to additional opportunities for executing method calls in parallel.
The Future interface, introduced in Java 5, models an asynchronous
computation by providing a reference to its result that becomes available
only when the computation is complete. The Thread that calls the future
can continue doing useful work while it waits for the result of the
computation to become complete.
Prior to Java 8, to work with a Future you have to wrap the
time-consuming operation inside a Callable object that is submitted to
an ExecutorService. For example, the following listing submits
a Future. After creating the future, the method can continue on until
the value of the future is retrieved with future.get(), which blocks
until the long computation is complete and the value of the future is
available.
ExecutorService executor = Executors.newFixedThreadPool(2);
Future<Double> future = executor.submit(new Callable<Double>() {
  public Double call() {
      return doSomethingLong();
  }});

/// do a bunch of things

Double result = future.get();  // blocks until doSomethingLong() completes
The Future interface is great for off-loading time consuming method
calls from the main thread, but the way they are constructed and used
makes it difficult to model dependencies among different futures. For
example, modelling an operation like “do something long, and when it is
done do this other long thing, and then when that is done combine the
results” is very difficult with only the Future interface.
CompletableFuture makes defining this type of operation possible with
a simple declarative interface.
To change our simple example into a CompletableFuture implementation, we
can start by using a simple lambda that is called by a new thread. The
following block of code creates a CompletableFuture, then a new thread
that is responsible for populating the value of the future using the
complete method. While this thread runs, your code is able to continue
until the point in time where you need to get the result from the
computation.
CompletableFuture<Double> future = new CompletableFuture<>();
new Thread( () -> {
  Double result = doSomethingLong();
  future.complete(result);
}).start();

/// do a bunch of things

Double result = future.get();  // blocks until doSomethingLong() completes
Composing Futures
At first glance this code block is very similar to the early Future case
without an ExecutorService. You can simplify this by using the
supplyAsync static factory method to create a future with a lambda that
implements the Supplier interface.
CompletableFuture<Double> future = CompletableFuture.supplyAsync(() -> doSomethingLong());
What’s more, you can chain CompletableFutures together using thenApply
like so:
CompletableFuture<String> completableFuture
  = CompletableFuture.supplyAsync(() -> "Hello");

CompletableFuture<String> future = completableFuture
  .thenApply(s -> s + " World");

assertEquals("Hello World", future.get());
Similar methods exist for thenRun, thenAccept, thenCompose, and more to
chain multiple futures together under a fluent API. What’s more, you can
timeout a combination of futures by adding the orTimeout or
completeOnTimeout calls to your call chain.
8 Reactive Programming with the Flow API
Reactive programming is programming that uses reactive streams
— a standardized technique for processing data asynchronously based on
a publish-subscribe protocol. Four interfaces represent the minimal set of
features that a reactive stream must implement, and these are now included
as part of Java 9 under the java.util.concurrent.Flow class.
The Flow API consists of three main concepts (Publisher, Subscriber,
and Subscription) that follow a few defined rules as part of the
specification:
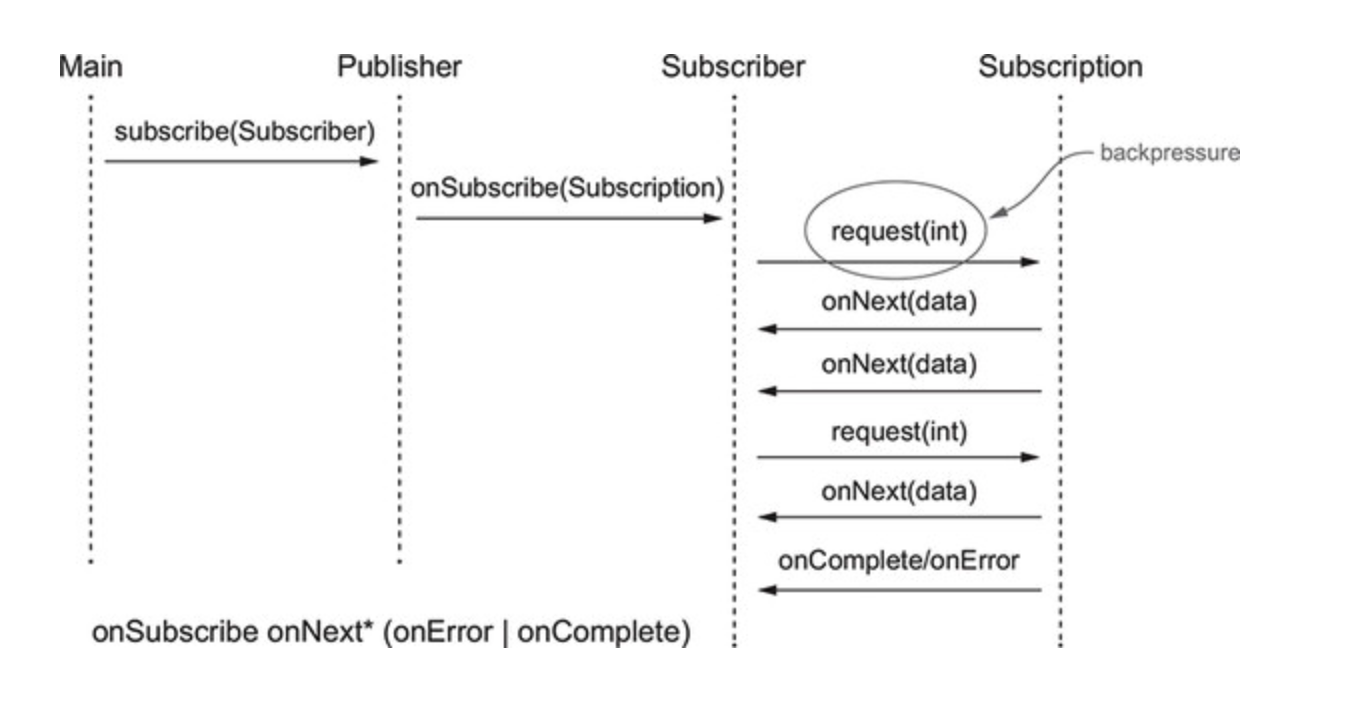
Publisher. Produce items consumed by one or moreSubscribers. Publishers must sendSubcribersno greater than the number of item requested (to facilitate backpressure).Publishersmay terminate aSubscriptionby callingonCompleteoronError.Subscriber. Registers as a listener of events published by aPublisher. Notifies thePublisherthat it is ready to receive and processnelements from the stream. Must respond toonCompleteandonErrorsignals by not calling any other publisher methods and considering the subscription cancelled.Subscription. Manage the relationship betweenProducersandSubscribers. One subscription is shared by exactly onePublisherand oneSubscriber. EachSubscriptionhas an idempotent and thread-safecancel()method. Once called, any other invocation on theSubscriptionhas no effect.
The following diagram shows the typical lifecycle of publishers, subscribers, and subscriptions when implementing the Flow API
Flow API Interfaces
The Publisher interface has a single subscribe method that takes
a Subscriber that will receive events.
@FunctionalInterface
public interface Publisher<T> {
    void subscribe(Subscriber<? super T> s);
}
The Subscriber interface has four callback methods that are invoked by
the Publisher when it produces the corresponding events.
public interface Subscriber<T> {
    void onSubscribe(Subscription s);
    void onNext(T t);
    void onError(Throwable t);
    void onComplete();
}
Lastly, the Subscription interface represents the 1-1 mapping between
a Publisher and a Subscriber. A Subscriber can request the next n
elements from the stream using the Subscription, and either
a Subscriber or a Publisher can cancel the subscription.
public interface Subscription {
    void request(long n);
    void cancel();
}
The last interface that exists that we haven’t covered is the Processor
interface. A Processor represents a transformation stage of the events
processed through the reactive stream that turn the elements in the
reactive stream from one type to another (similar to the map method on
a stream).
public interface Processor<T, R> extends Subscriber<T>, Publisher<R> { }
Flow API Implementations
If you are doing reactive programming, it is great to understand the interfaces behind the Flow API and how to use them, but it should be rare that you need to implement these interfaces yourself unless you are creating a reactive framework yourself. Instead, you can use existing libraries and frameworks that implement the Flow API like Akka, Reactor, RxJava, and Vert.x.
9 Java Module System
The Java Module System was the main feature of the Java 9 release. Originally developed as part of Project Jigsaw, the designs for Java modules took almost a decade to complete!
The essence of the module system is providing an additional way to
structure your programs that promotes separation of concerns and
information hiding. This is done by introducing a new keyword module
that makes up part of module descriptor including the dependencies the
module requires and the types that the module exports.
The following example module descriptor includes the name of the module
application, the modules it requires (in our case a sample utility
clas), and the types that it exports.
module application {
  requires com.sookocheff.example.utilities;

  exports com.sookocheff.example;

}
Module descriptors lives in a special file called module-info.java,
which is in turn compiled to module-info.class.
|─ application
  |─ module-info.java
  |─ com
    |─ sookocheff
      |─ application
        |─ ExampleApplication.java
For libraries that haven’t been modularized, any JAR on the module path
without a module-info.java file becomes an automatic module. Automatic
modules implicitly export all their packages and are given a name derived
from the name of the JAR file.
In addition to the requires and exports keywords, modules may use
requires-transitive, exports-to, open, opens, uses, and
provides. Covering the entirety of this system is too much for an
article like this, so if you are really interested in learning more, there
is an entire book
dedicated to it.
10 Local Variable Type Inference with var
In Java 10, the var keyword allows local variable type inference, which
means the type for a local variable declared inside a method will be
inferred by the compiler. This saves you the boilerplate of having to
declare that type explicitly. For example, the following block of code
uses local type inference to declare a String without writing the
explicit String type.
String s1 = new String("Java 9 without var");

var s2 = new String("Java 10 with var"); // local type inference
In such a simple example, there is not much difference, but the var
keyword does help when you are dealing with more complex types like
Collection and Stream.
Java is still a statically typed language, and for the var keyword to
work there needs be enough information for the compiler to infer the type
of a local variable and once that type is known, it cannot be changed.
11 Switch Expressions
Java 12 introduced switch expressions, which (like all expressions)
evaluate to a single value and can be used in statements. For example, the
following block of code embeds a switch expression inside a println
method. The result of the switch expression is returned as a value and printed.
Day day = Day.WEDNESDAY;
System.out.println(
  switch (day) {
    case MONDAY, FRIDAY, SUNDAY -> 6;
    case TUESDAY                -> 7;
    case THURSDAY, SATURDAY     -> 8;
    case WEDNESDAY              -> 9;
    default -> throw new IllegalStateException("Invalid day: " + day);
  }
);
Switch expressions also introduce the “arrow case” syntax -> that
is used inside a case label. At runtime, any of the cases to the left of
the arrow are matched with the switch value, and then the code on the
right of the arrow runs. Case labels with the arrow syntax do not fall
through to the next case, and so you do not need break statements.
Optionally, you can explicitly declare the return value of a switch
expression using the yield statement.
int numLetters = switch (day) {
  case MONDAY, FRIDAY, SUNDAY -> {
    System.out.println(6);
    yield 6;
  }
  case TUESDAY -> {
    System.out.println(7);
    yield 7;
  }
  case THURSDAY, SATURDAY -> {
    System.out.println(8);
    yield 8;
  }
  case WEDNESDAY -> {
    System.out.println(9);
    yield 9;
  }
  default -> {
    throw new IllegalStateException("Invalid day: " + day);
  }
};
12 Text Blocks and Multi Line Strings
Since Java 15, text blocks are a standard feature allowing you to easily
construct multi line strings. Text blocks start with a tripe quotation
marks """ followed by optional whitespaces and a newline. The text block
is terminated with another pair of """. For example, a very simple
example looks like:
String example = """
     Text block""";
Within the text we are free to use newlines and quote marks without having to escape them. The text block also respect any indentation and removes any leading whitespace when the String is built. This is really useful for keeping the formatting of source code.
String html = """
    <html>

        <body>
            <span>example text</span>
        </body>
    </html>""";
This format of multi-line strings is much more elegant than the existing
alternatives using String concatenation or StringBuilder.
String s = "Lorem ipsum dolor sit amet, consectetur adipiscing elit\n"
  + "sed do eiusmod tempor incididunt ut labore et dolore magna\n"
  + "aliqua. Ut enim ad minim veniam, quis nostrud exercitation ullamco\n"
  + "laboris nisi ut aliquip ex ea commodo consequat. Duis aute\n"
  + "irure dolor in reprehenderit in voluptate.";
String s = new StringBuilder()
  .append("Lorem ipsum dolor sit amet, consectetur adipiscing elit\n")
  .append("sed do eiusmod tempor incididunt ut labore et dolore magna\n")
  .append("aliqua. Ut enim ad minim veniam, quis nostrud exercitation ullamco\n")
  .append("laboris nisi ut aliquip ex ea commodo consequat. Duis aute\n")
  .append("irure dolor in reprehenderit in voluptate.")
  .toString();
13 Record Classes
A Record is a special kind of Java class for defining immutable
data-only classes with a concise syntax. A Record contains one or more
data fields which correspond to member variables in a regular Java class.
With records, the Java compiler auto generates getter, toString(), hashcode() and equals() methods for these data fields, removing a lot of the boilerplate necessary in defining immutable Java classes. Since a Java Record is immutable, no setter methods are generated.
Prior to Java 14, if you wanted to create an immutable class you would create data classes with the following characteristics:
- a
private finalfield for each piece of data - a
getterfor each field - a
publicconstructor with a corresponding argument for each field - an
equalsmethod that returns true for objects of the same class when all fields match - a
hashCodemethod that returns the same value when all fields match - a
toStringmethod that includes the name of the class and the name of each field and its corresponding value
public final class Rectangle {
    private final double length;
    private final double width;

    public Rectangle(double length, double width) {
        this.length = length;
        this.width = width;
    }

    double length() { return this.length; }
    double width()  { return this.width; }

    // Implementation of equals() and hashCode(), which specify
    // that two record objects are equal if they
    // are of the same type and contain equal field values.
    public boolean equals...
    public int hashCode...

    // An implementation of toString() that returns a string
    // representation of all the record class's fields,
    // including their names.
    public String toString() {...}
}
Writing this by hand is tedious, and using a tool like Lombok introduces an extra dependency to deal with.
With Java 14 and above, you can replace all of this boilerplate using the
record keyword
record Rectangle(double length, double width) { }
The record syntax removes all of the boilerplate, and it makes the purpose of the class clear at a glance — this is a simple data class.
The record class generates a canonical constructor, but this can be overridden if we need to do any validation. Record constructors also allow us to remove constructor parameters since they can be implied by the record itself.
record Rectangle(double length, double width) {
    public Rectangle {
        if (length <= 0 || width <= 0) {
            throw new java.lang.IllegalArgumentException(
                String.format("Invalid dimensions: %f, %f", length, width));
        }
    }
}
You can also explicitly add methods to the class using regular method syntax.
record Rectangle(double length, double width) {

    // Public accessor method
    public double length() {
        System.out.println("Length is " + length);
        return length;
    }
}
Records and Lombok
Project Lombok is a Java library that is
often used to remove the boilerplate involved in writing Java classes.
A Java record can be considered as equivalent to Lombok’s @Value
annotation.
Unfortunately, Records are not a complete replacement for Lombok. For
example, Records are for immutable data, whereas the @Data annotation in
Lombok allows for mutation of data while still auto-generating most of the
boilerplate. Lombok will continue to co-exist with records (and Java) for
a longer time yet.
14 Pattern Matching
Pattern matching is a common technique in ML (Meta Language) derived languages that involves testing whether an object has a particular structure, and then extracting data from that object if there’s a match. You can already do this with plain old Java but the pattern matching syntax provides more concise and robust code.
Pattern matching comes in two flavours: matching with instanceof and
matching with switch expressions.
Pattern Matching with instanceof
First, consider a simple block of code that checks whether an object is of a certain type:
if (shape instanceof Rectangle) {
  Rectangle r = (Rectangle) shape;
  return 2 * r.length() + 2 * r.width();
}
Checking whether an object is a certain type, then extracting the type, and using it in a computation is a common idiom in Java. We can simplify this with pattern matching.
In Java, a pattern is a combination of a target that is tested with
a predicate, and a set of pattern variables that are assigned if the
predicate is successful. In the following example, our target is the
shape variable, the predicate is the instanceof operator, and the
pattern variable is r.
if (shape instanceof Rectangle r) {
  return 2 * r.length() + 2 * r.width();
}
Pattern Matching with switch
Another common idiom in Java is using a switch statement to select the
code block to execute. This version of pattern matching is quite similar
to matching with instanceof — for each case statement we state
the predicate and a pattern variable that is assigned when the
predicate is true. This simplifies the resulting code by providing access
to the pattern variable immediately in the case block.
return switch (shape) {
    case Rectangle r -> 2 * r.length() + 2 * r.width();
    default          -> throw new IllegalArgumentException("Unrecognized shape");
    };
}
15 Sealed Classes
Sealed classes allow more fine-grained control over inheritance relationships. Before Java 15 and the introduction of sealed classes, Java assumed that code reuse is always a goal — every class was extendable by any number of subclasses. Now, a class or interface can define which classes can implement or extend it.
In contrast to creating package-private classes, sealed classes provide the possibility for a superclass to be widely accessible but not widely extensible.
To seal an interface, we use the sealed modifier in combination with the
permits clause. The permits clause then specifies the classes that are
allowed to implement the sealed interface:
public sealed interface Vehicle permits Car, Truck {

  // ...

}
Similar to interfaces, we can apply the same modifier classes. The only restriction is that the permits clause should be defined after any extends or implements clauses:
public abstract sealed class Vehicle permits Car, Truck {

  // ...

}
That’s really all there is to defining sealed classes with the exception of three important constraints on subclasses:
- All permitted subclasses must belong to the same module as the sealed class.
- Every permitted subclass must explicitly extend the sealed class.
- Every permitted subclass must define a modifier: final, sealed, or non-sealed.
16 jwebserver
jwebserver, available since Java 18, provides a command-line tool to
start a minimal web server that serves static files only. No CGI or
servlet-like functionality is available.
This tool is useful for prototyping, ad-hoc coding, and testing.
You can start the web server with a simple command:
$ jwebserver
If startup is successful, the server prints a message to System.out
listing the local address and the absolute path of the directory being
served. For example:
$ jwebserver
Binding to loopback by default. For all interfaces use "-b 0.0.0.0" or "-b ::".
Serving /cwd and subdirectories on 127.0.0.1 port 8000
URL http://127.0.0.1:8000/
By default, the files of the current directory are served, and every request is logged on the console.
Resources
For more information on these changes, consult the following resources.