kind is a tool built for running local Kubernetes clusters using Docker containers as nodes. kind was primarily designed for testing Kubernetes itself, but it is actually quite useful for creating a Kubernetes environment for local development, QA, or CI/CD. This blog post shows you how to setup a kind-based environment for local development that can mimic a production Kubernetes environment.
A fully functioning environment using kind includes a few different components. For our purposes, we will install the following list of software.
- Docker.
- The kubectl tool.
- A local Docker registry.
- kind.
- An Ingress controller.
We can use these steps to create a repeatable script to setup a local Kubernetes cluster whenever you need it.
Docker
The kind project stands for “Kubernetes in Docker”. As such, you will need to install Docker to get started. This is typically environment specific, and you may need to consult the Docker documentation if you get stuck. The following should get you started:
macOS
The easiest way to install Docker for macOS is using Docker Desktop by going to the download page and grabbing the image. Click-to-install and you should be ready to go.
Linux (Ubuntu)
Older versions of Docker were called docker, docker.io, or
docker-engine. If these are installed you should start by getting rid of
them:
$ sudo apt-get remove docker docker-engine docker.io containerd runc
Once done, you can add the Docker apt repository to support future installations over apt. To do so, we need to first install packages necessary for installing from apt over HTTPS.
$ sudo apt-get install \
    apt-transport-https \
    ca-certificates \
    curl \
    gnupg-agent \
    software-properties-common
Then, we can add the Docker apt repository by adding Docker’s GPG key and followed by adding the apt repository.
$ curl -fsSL https://download.docker.com/linux/ubuntu/gpg | sudo apt-key add -
$ sudo add-apt-repository \
   "deb [arch=amd64] https://download.docker.com/linux/ubuntu \
   $(lsb_release -cs) \
   stable"
Lastly, update the apt repository given the new Docker source, and install Docker.
$ sudo apt-get update
$ sudo apt-get install docker-ce docker-ce-cli containerd.io
Windows with WSL2
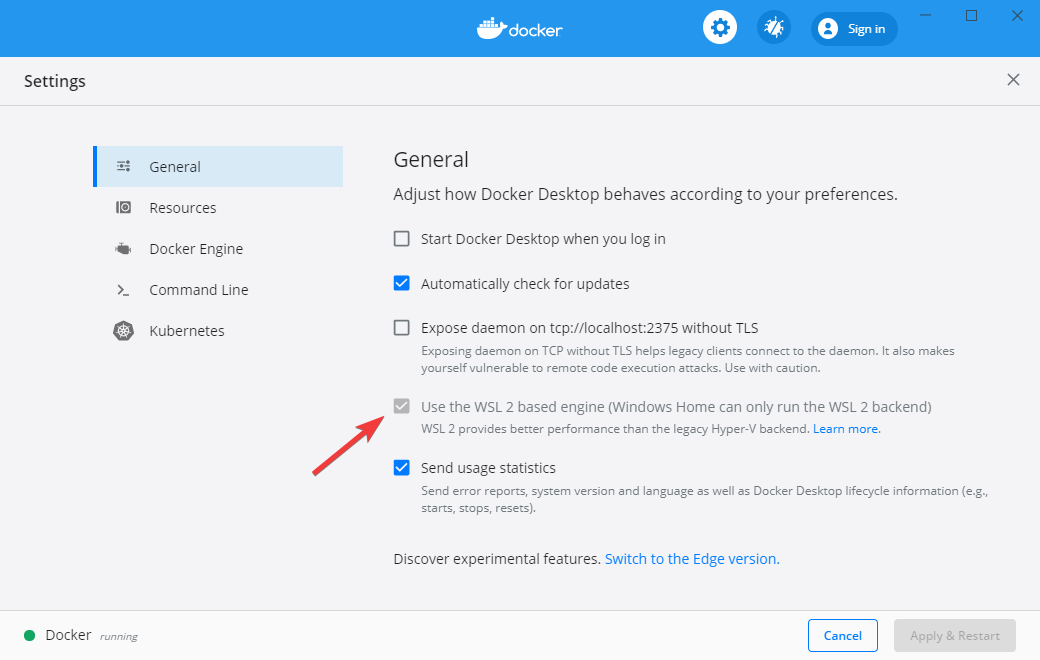
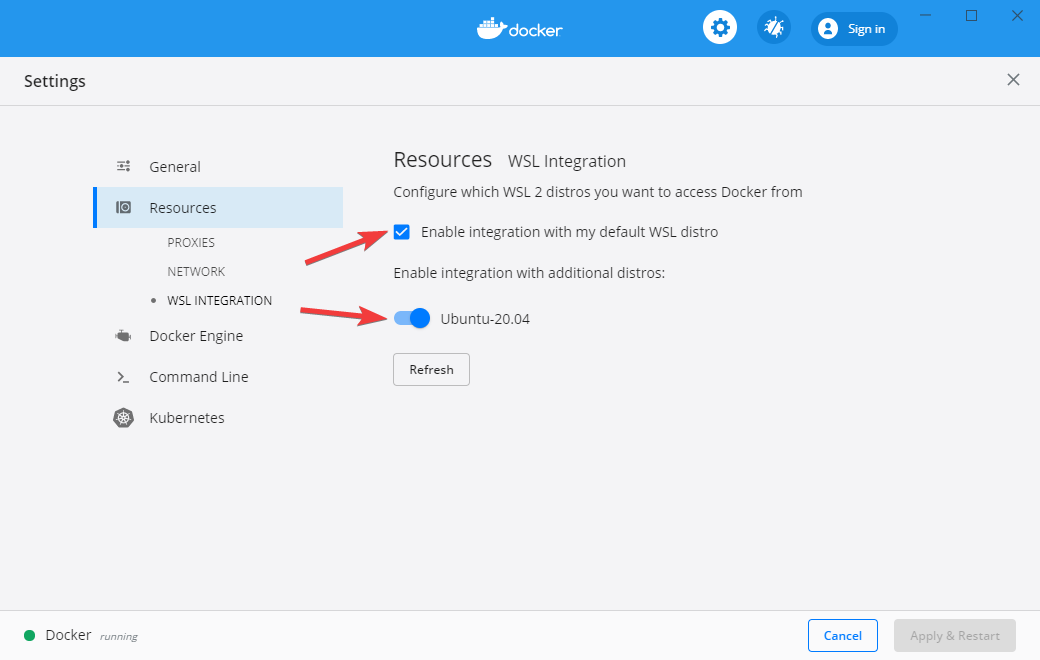
Newer versions of Windows include the Windows Subsystem for Linux 2 (WSL2) that provides excellent integration with Docker. To get started you first need to install WSL2 using the instructions here. Once this is done, you can install Docker Desktop.
After Docker Desktop is installed, open the Docker dashboard and make sure that WSL2 integration is enabled. This involves checking a few boxes: one for enabling WSL2 as the Docker engine backend, and a second for enabling WSL2 for the particular Linux images you are using.
Kubectl
kind does not strictly require kubectl, but because we are aiming to setup a fully functioning development environment we are going to install kubectl to be able to do some basic Kubernetes functions on our cluster.
If you get stuck at any point, refer to the official kubectl installation instructions.
macOS
On macOS, kubectl is available through Homebrew
$ brew install kubectl
Linux (Ubuntu)
Linux users (and Windows users using WSL2) can fetch kubectl through the Google apt repository:
$ curl -s https://packages.cloud.google.com/apt/doc/apt-key.gpg | sudo apt-key add -
$ echo "deb https://apt.kubernetes.io/ kubernetes-xenial main" | sudo tee -a /etc/apt/sources.list.d/kubernetes.list
$ sudo apt-get update
$ sudo apt-get install -y kubectl
kind
Now we can finally install kind. Kind publishes binaries to Github. These can be installed through Homebrew on a Mac, or by downloading the release for Linux distributions.
macOS
$ brew install kind
Linux (Ubuntu)
$ curl -Lo ./kind https://kind.sigs.k8s.io/dl/v0.9.0/kind-linux-amd64
$ chmod +x ./kind
$ mv ./kind /usr/local/bin
Creating Kubernetes clusters using kind
kind is a tool for running local Kubernetes clusters using Docker containers as Kubernetes Nodes. To see how this work, let’s create a cluster with the default settings:
$ kind create cluster
Creating cluster "kind" ...
 ✓ Ensuring node image (kindest/node:v1.18.2) 🖼
 ✓ Preparing nodes 📦
 ✓ Writing configuration 📜
 ✓ Starting control-plane 🕹️
 ✓ Installing CNI 🔌
 ✓ Installing StorageClass 💾
Set kubectl context to "kind-kind"
You can now use your cluster with:

kubectl cluster-info --context kind-kind

Thanks for using kind! 😊
By default, this will create a single Kubernetes node running as a docker
container named kind-control-plane and configures kubectl to use this
cluster. You can view the Docker container running your cluster through
the docker ps command:
$ docker ps
CONTAINER ID        IMAGE                  COMMAND                  CREATED              STATUS              PORTS                       NAMES
be5e7eec765b        kindest/node:v1.18.2   "/usr/local/bin/entr…"   About a minute ago   Up 57 seconds       127.0.0.1:43937->6443/tcp   kind-control-plane
Or through your newly configured kubectl.
$ kubectl get nodes
NAME                 STATUS   ROLES    AGE     VERSION
kind-control-plane   Ready    master   5m29s   v1.18.2
You can delete your cluster at any time using the kind delete cluster
command:
$ kind delete cluster
Deleting cluster "kind" ...
You can also run a specific version of Kubernetes using the --image
flag. For example, to create a Kubernetes cluster using version 1.14.10 of
Kubernetes you would use the following command:
$ kind create cluster --image kindest/node:v1.14.10
Adding more nodes to your cluster
By default, kind creates a cluster with a single node. You can add
additional nodes using a yaml-based configuration file that follows
Kubernetes conventions. A minimum viable configuration just specifies the
type of resource to create (Cluster), and the apiVersion to use:
kind: Cluster
apiVersion: kind.x-k8s.io/v1alpha4
By saving this configuration to a file, you can create a cluster using it
through the --config flag.
$ kind create cluster --config kind-config.yaml
You can add more nodes to your cluster by altering this configuration. This creates a more “realistic” Kubernetes environment, but is really not necessary unless you are testing specific features like rolling updates.
kind: Cluster
apiVersion: kind.x-k8s.io/v1alpha4
nodes:
  - role: control-plane
  - role: worker
  - role: worker
We can create a cluster using this configuration using the create cluster command.
$ kind create cluster --config kind-3nodes.yaml
And view the three running nodes with kubectl.
$ kubectl get nodes
NAME                 STATUS   ROLES    AGE   VERSION
kind-control-plane   Ready    master   79s   v1.18.2
kind-worker          Ready    <none>   41s   v1.18.2
kind-worker2         Ready    <none>   40s   v1.18.2
Go ahead and delete this cluster before continuing on.
$ kind delete cluster
Creating a local Docker registry
One of the challenges in using Kubernetes for local development is getting local Docker containers you create during development to your Kubernetes cluster. Configuring this correctly allows Kubernetes to access any Docker images you create locally when deploying your Pods and Services to the cluster you created using kind. There are a few ways to solve this problem, but the one I prefer is to create a local Docker registry that your Kubernetes cluster can access. This version most closely matches a production deployment of Kubernetes.
The following example creates a Docker registry called kind-registry
running locally on port 5000. This script first inspects the current
environment to check if we already have a local registry running, and if
we do not, then we start a new registry. The registry itself is simply an
instance of the registry Docker image available on Docker
Hub. We use the docker run command
to start the registry.
#!/bin/sh
reg_name='kind-registry'
reg_port='5000'
running="$(docker inspect -f '{{.State.Running}}' "${reg_name}" 2>/dev/null || true)"
if [ "${running}" != 'true' ]; then
  docker run \
    -d --restart=always -p "${reg_port}:5000" --name "${reg_name}" \
    registry:2
fi
Now that we have a registry created, we can configure kind to use this registry for pulling container images during deployments. We do this using the configuration below. In this example, we run a single node Kubernetes cluster add some configuration to the containerd interface to allow pulling images from a local Docker registry.
kind: Cluster
apiVersion: kind.x-k8s.io/v1alpha4
containerdConfigPatches:
- |-
  [plugins."io.containerd.grpc.v1.cri".registry.mirrors."localhost:5000"]
    endpoint = ["http://kind-registry:5000"]
We can save this file as local-registry.yaml and then create the cluster
using kind:
$ kind create cluster --config local-registry.yaml
The last step we have is to connect the kind cluster’s network with the local Docker registry’s network:
$ docker network connect "kind" "kind-registry"
Deploying an application to your cluster
Now that we have kind deployed and a local registry enabled, we can test the cluster by deploying a new service. For this demonstration, I’ve created a simple Python server using Flask, and a corresponding Dockerfile to package it for deployment to our Kubernetes cluster.
Here is our simple Python server:
import os

import flask
from flask import request, jsonify

app = flask.Flask(__name__)

@app.route("/")
def hello_world():
    return "Hello, world!"

app.run(host='0.0.0.0', port=8080)
And the corresponding Docker file:
FROM python:3.8-slim-buster
COPY . /app
WORKDIR /app
RUN pip install --upgrade pip
RUN pip install flask flask_cors dapr
ENTRYPOINT ["python"]
EXPOSE 8080
CMD ["app.py"]
You can build this application as a Docker container using the docker build command. The following line tags the build using the -t flag and
specifies the local repository we created earlier.
$ docker build -t localhost:5000/pyserver:0.1 .
At this point, we have a Docker container built and tagged. Next we can
push it to our local repository with the docker push command.
$ docker push localhost:5000/pyserver:0.1
You can check that this application is working by running the newly built
Docker container and navigating to localhost:8080:
$ docker run -p 8080:8080 localhost:5000/pyserver:0.1
Ingress into kind
Since a typical service needs to be accessed by the Internet, we will also run an Ingress controller to broker connections between our local environment and the Kubernetes cluster. We do this by adding a few extra directives to the configuration of our cluster and then deploying the nginx Ingress controller.
We start by create a kind cluster with extraPortMappings and
node-labels directives.
- extraPortMappings allows
localhostto make requests to the Ingress controller over ports 80/443. This is similar to Docker’s-pflag. - node-labels restricts the Ingress controller to run on a specific set of nodes matching the label selector.
kind: Cluster
apiVersion: kind.x-k8s.io/v1alpha4
containerdConfigPatches:
- |-
  [plugins."io.containerd.grpc.v1.cri".registry.mirrors."localhost:5000"]
    endpoint = ["http://kind-registry:5000"]
nodes:
- role: control-plane
  kubeadmConfigPatches:
  - |
    kind: InitConfiguration
    nodeRegistration:
      kubeletExtraArgs:
        node-labels: "ingress-ready=true"
  extraPortMappings:
  - containerPort: 80
    hostPort: 80
    protocol: TCP
  - containerPort: 443
    hostPort: 443
    protocol: TCP
You can save this yaml file as kind-ingress.yaml and create the cluster
using the kind create cluster command:
$ kind create cluster --config kind-ingress.yaml --image kindest/node:v1.18.8
Our cluster is now capable of supporting Ingress controllers, so we can deploy one of the available options. In this tutorial I will use Nginx ingress which provides a deployment we can leverage through Github:
$ kubectl apply -f https://raw.githubusercontent.com/kubernetes/ingress-nginx/master/deploy/static/provider/kind/deploy.yaml
Deploying our service
Finally we get to the good part: deploying our service into our local Kubernetes cluster! For this, we reference typically Kubernetes behaviour of creating a Service and an Ingress. The following yaml file references the Docker image for our service that we deployed to our local Docker registry:
kind: Pod
apiVersion: v1
metadata:
  name: pyserver
  labels:
    app: pyserver
spec:
  containers:
  - name: pyserver
    image: localhost:5000/pyserver:0.1
---
kind: Service
apiVersion: v1
metadata:
  name: pyserver
spec:
  selector:
    app: pyserver
  ports:
  # Port used by the Docker image
  - port: 8080
---
apiVersion: networking.k8s.io/v1beta1
kind: Ingress
metadata:
  name: pyserver-ingress
spec:
  rules:
  - http:
      paths:
      - path: /
        backend:
          serviceName: pyserver
          servicePort: 8080
---
By saving this yaml file as service.yaml, we can deploy this to our
cluster using kubectl:
$ kubectl apply -f service.yaml
And verify that requests to localhost reach our server through the
Ingress controller using curl:
$ curl localhost
Hello, World
Putting Everything Together
This post has covered a lot of ground. Thankfully, each of these steps can be automated so we don’t have to start from scratch each time. You can use the following Bash script to create a Kubernetes cluster with Ingress any time. Use this for local development, QA, or continuous integration!
#!/bin/sh
set -o errexit

reg_name='kind-registry'
reg_port='5000'
k8s_version='1.18.8'

# Start a local Docker registry (unless it already exists)
running="$(docker inspect -f '{{.State.Running}}' "${reg_name}" 2>/dev/null || true)"
if [ "${running}" != 'true' ]; then
  docker run \
    -d --restart=always -p "${reg_port}:5000" --name "${reg_name}" \
    registry:2
fi

# Create a kind cluster
# - Configures containerd to use the local Docker registry
# - Enables Ingress on ports 80 and 443
cat <<EOF | kind create cluster --image kindest/node:v${k8s_version} --config=-
kind: Cluster
apiVersion: kind.x-k8s.io/v1alpha4
containerdConfigPatches:
- |-
  [plugins."io.containerd.grpc.v1.cri".registry.mirrors."localhost:${reg_port}"]
    endpoint = ["http://${reg_name}:${reg_port}"]
nodes:
- role: control-plane
  kubeadmConfigPatches:
  - |
    kind: InitConfiguration
    nodeRegistration:
      kubeletExtraArgs:
        node-labels: "ingress-ready=true"
  extraPortMappings:
  - containerPort: 80
    hostPort: 80
    protocol: TCP
  - containerPort: 443
    hostPort: 443
    protocol: TCP
EOF

# Connect the local Docker registry with the kind network
docker network connect "kind" "${reg_name}" > /dev/null 2>&1 &

# Deploy the nginx Ingress controller
kubectl apply -f https://raw.githubusercontent.com/kubernetes/ingress-nginx/master/deploy/static/provider/kind/deploy.yaml