Submitting a Unity3d game to the Mac App Store is a somewhat painful process. This guide refers to Unity3d 3.5 but should apply to Unity 4.0 and up.
Building
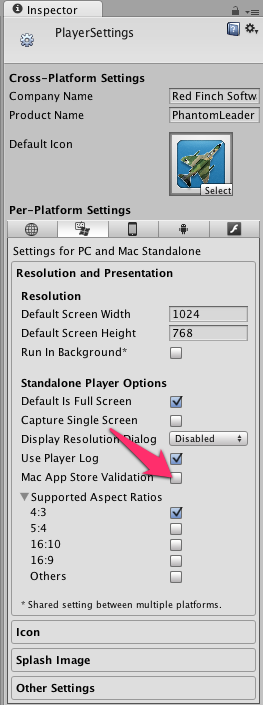
First, build your application for Mac and make sure that you uncheck Mac App Store Validation in the PlayerSettings Inspector window.
Building your App from Unity will create a .App file. Navigate to this file in Finder and right-click. Choose Show Package Contents from the context menu to open your app as a folder.
Info.plist
Navigate to the Contents directory and open the file Info.plist in your favorite text editor. You will need to make a few changes to this file.
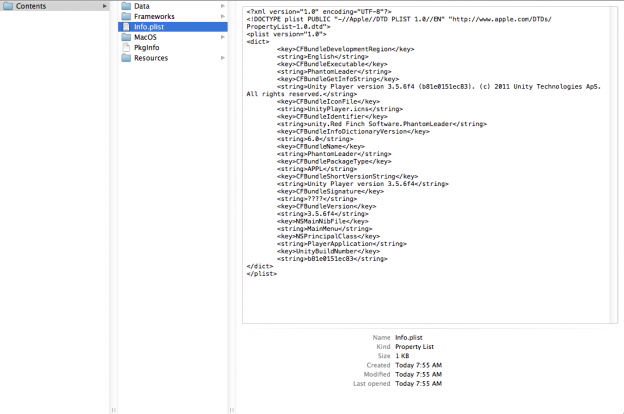
Specifically, you will need to edit the following entries to correspond to your specific application.
CFBundleExecutable: The name of your game.
CFBundleGetInfoString: Human readable information about your game.
CFBundleIdentifier: The App identifier you registered at the Mac App Store.
CFBundleName: The name of your game.
CFBundleShortVersionString: The version number of your game.
NSHumanReadableCopyright: Your copyright.
LSApplicationCategoryType: The category of your application.
The end result will look something like this:
<?xml version="1.0" encoding="UTF-8"?>
<!DOCTYPE plist PUBLIC "-//Apple//DTD PLIST 1.0//EN" "http://www.apple.com/DTDs/PropertyList-1.0.dtd">
<plist version="1.0">
<dict>
    <key>CFBundleDevelopmentRegion</key>
    <string>English</string>
    <key>CFBundleExecutable</key>
    <string>PhantomLeader</string>
    <key>CFBundleGetInfoString</key>
    <string>Phantom Leader version 1.0.7</string>
    <key>CFBundleIconFile</key>
    <string>icons.icns</string>
    <key>CFBundleIdentifier</key>
    <string>com.dvg.phantomleadermac</string>
    <key>CFBundleInfoDictionaryVersion</key>
    <string>6.0</string>
    <key>CFBundleName</key>
    <string>PhantomLeader</string>
    <key>CFBundlePackageType</key>
    <string>APPL</string>
    <key>CFBundleShortVersionString</key>
    <string>1.0.7</string>
    <key>CFBundleSignature</key>
    <string>????</string>
    <key>CFBundleVersion</key>
    <string>1.0.7</string>
    <key>NSMainNibFile</key>
    <string>MainMenu</string>
    <key>NSPrincipalClass</key>
    <string>PlayerApplication</string>
    <key>NSHumanReadableCopyright</key>
    <string>Dan Verssen Games/Red Finch Software</string>
    <key>LSApplicationCategoryType</key>
    <string>public.app-category.board-games</string>
    <key>UnityBuildNumber</key>
    <string>b81e0151ec83</string>
</dict>
</plist>
You can get more information about these keys from the Apple developer documentation. The most notable key in need of changing is the LSApplicationCategoryType which must correspond to an actual category on the Mac App Store. You can find the LS keys documentation here.
Icons
You will need to generate an iconset matching Apple’s Human Interface Guidelines. The first step is to create all of the required icons. You will need variations of your icon supporting the following resolutions.
icon_16x16.png
icon_16x16@2x.png
icon_32x32.png
icon_32x32@2x.png
icon_128x128.png
icon_128x128@2x.png
icon_256x256.png
icon_256x256@2x.png
icon_512x512.png
icon_512x512@2x.png
Place all of these icons in the same folder called icons.iconset. Now we have to drop in to Terminal and run the iconutil program to create your icns file which will be named the same as your icons folder. Running
iconutil -c icns
will generate a file called icons.icns. You will need to replace the file UnityPlayer.icns with this icon file using Finder. The UnityPlayer.icns file is located in Contents -> Resources within your .App.
Entitlements
All Apps on the Mac App Store must be sandboxed. To sandbox your Unity app you have to provide an entitlements file to use during the code signing process. A fairly minimal entitlements file should look something like this.
<?xml version="1.0" encoding="UTF-8"?>
<!DOCTYPE plist PUBLIC "-//Apple//DTD PLIST 1.0//EN" "http://www.apple.com/DTDs/PropertyList-1.0.dtd">
<plist version="1.0">
<dict>
    <key>com.apple.security.app-sandbox</key> <true/>
    <key>com.apple.security.device.usb</key> <true/>
</dict>
</plist>
You can read more about entitlements at the Entitlement Key Reference.
Code Signing
Now that we have our iconset and entitlements ready we can codesign our App for delivery to the Mac App Store. We have to drop back to the Terminal to run the codesign application.
codesign --force --sign "3rd Party Mac Developer Application: XXXX" --entitlements yourapp.entitlements YourApp.app
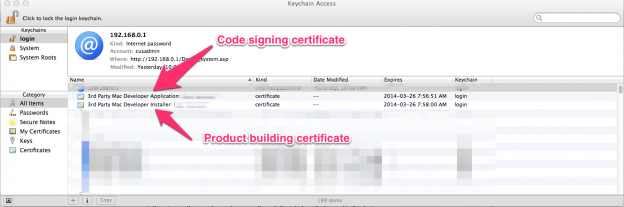
You can find “XXXX” in the Keychain Access program. Look for a code signing certificate beginning with the text “3rd Party Mac Developer Application” you will need to copy this entire text to the codesign command above. You can find more details from the App Store Submission documentation.
In addition to signing your app you must sign libmono.dylib.
codesign --force --sign "3rd Party Mac Developer Application: XXXX" --entitlements yourapp.entitlements YourApp.app/Contents/Frameworks/MonoEmbedRuntime/osx/libmono.0.dylib
If you don’t have the required Keychain Access certificates you will need to create these using the Apple Member Center.
Product Building
To build your final product run productbuild from the command line.
productbuild --component /YourApp.app /Applications --sign "3rd Party Mac Developer Installer: XXXX" YourApp.pkg
Where “XXXX” is again from Keychain Access. This time, use the certificate beginning with “3rd Party Mac Developer Installer”.
Application Loader
You are finally ready to submit your App! Before submission you must create your App on iTunes Connect and fill out detailed app information. After your app is created launch Application Loader and click on Deliver Your App. Choose the application you created in iTunes Connect from the drop down menu and follow the prompts to choose your .pkg file that was created with the productbuild command.
Your done! Click submit and, if all went well, you will see your app will be delivered to the App Store and be ready for review.