I first learned Vim in university and, since then, it has been a welcome companion for the majority of my software engineering career. Working with Python and Go programs felt natural with Vim and I was always felt productive. Yet Java was always a different beast. Whenever an opportunity to work with Java came up, I would inevitably try Vim for a while, but fall back to IntelliJ and the IdeaVim plugin to take advantage of the rich language features a full-featured IDE can give you.
Unfortunately, IntelliJ has it’s own problems. At random, and sometimes inopportune times, it just stops functioning until all caches are rebuilt, projects are reloaded, and a half day or more of troubleshooting is done to get the IDE back on its feet. Having went through this song and dance a few months ago, and looking at the advancements in Vim, Neovim, and the language server protocol specification and implementations, I thought maybe it was time to take another look at using Neovim as a Java IDE.
Is it possible? Yes. Would I recommend it? Maybe. Am I insane? Probably.
Let’s go.
If you want to jump to the full configuration, it is available on Github.
The Landscape
Pushing Neovim from a simple text-editor to a full-feature IDE requires a few moving parts, so it’s a good idea to take a minute and first understand all of the pieces involved and how they interact with each other before diving into some arcane configuration options.
The features I am looking for from an IDE are code navigation (go to definition, find references, go to implementation), code completion, signature hints, refactoring, and debugging. Modern implementations of the language server protocol cover the majority of these cases, and a newer companion project — the debug adapter protocol — handles debugging.
Together, the language server, debugger, and debug adapter interact with your code as in the following diagram.
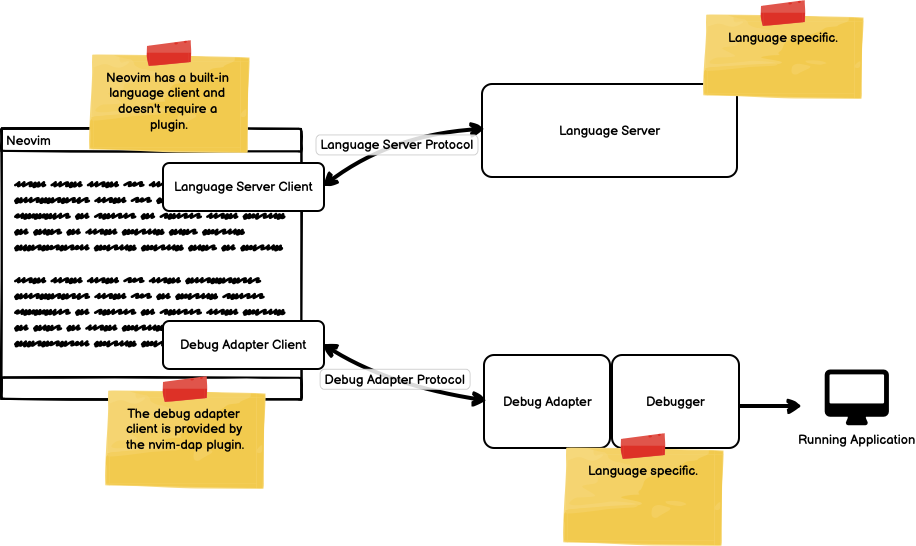
The nice thing about this diagram is that it is not specific to Java. Once you understand how to get things working for one language, you can repeat the process for any language that implements the language server protocol and debug adapter protocol. For Java, we use Eclipse JDT LS as the language server implementation, and vscode-java-debug as the debug adapter (which leverages java-debug).
Getting Started
Neovim embeds the Lua 5.1 script engine and LuaJIT compiler into the editor itself. This means that a full-featured and highly performant language is available at all times. It also significantly reduces the need for alternative language support. I wanted to simplify Neovim’s footprint, so the first thing I’ve done is disable support for language providers I don’t use.
-- disable language provider support (lua and vimscript plugins only)
vim.g.loaded_perl_provider = 0
vim.g.loaded_ruby_provider = 0
vim.g.loaded_node_provider = 0
vim.g.loaded_python_provider = 0
vim.g.loaded_python3_provider = 0
The practical effect of this change means that all plugins I choose are native vimscript and Lua only. So far, I haven’t found this change too limiting but time will tell. The integration of Lua into Neovim has resulted in an explosion in both the quality and quantity of plugins to choose from.
There are many alternative Neovim plugins that work slightly differently that you may prefer to my setup. The project Awesome Neovim collects many of the best and most mature plugins.
Lastly, I chose to use neovim’s built in LSP client, which reduces the number of required depencencies. If you prioritize easy of use over simplicity, you may prefer coc.nvim.
Plugin Manager
Turning Neovim into a full-featured IDE requires extending it with plugins. I
chose packer.nvim as my pure Lua
plugin manager. To get started, you need to clone packer to your packpath,
which is the directory where your Neovim installation finds packages.
Once this step is done, packer.nvim will manage itself and you don’t
need to worry about packpath from this point onwards. The default
configuration on macOS will be something like this:
git clone --depth 1 https://github.com/wbthomason/packer.nvim\
 ~/.local/share/nvim/site/pack/packer/start/packer.nvim
Then you can write your plugin specification in Lua. For example, edit the file
~/.config/nvim/lua/plugins.lua with a valid plugin specification, and then
load that specification using require('plugins') in your init.lua file.
For example, this is the contents of my plugins.lua file:
return require('packer').startup(function(use)
  -- Packer can manage itself
  use 'wbthomason/packer.nvim'

  use 'mfussenegger/nvim-dap'
  use 'mfussenegger/nvim-jdtls'
  use 'nvim-lua/plenary.nvim'
end)
Packer is quite sophisticated and allows you to specify dependencies and setup plugins as part of the plugin specification, but I’ve found it simpler to just setup more complex plugins separately and let packer simply handle installation. As usual, use your own judgement and feel free to adjust as necessary.
Once you have a valid packer configuration, in ~/.config/nvim/init.lua you
can import the specification with require('plugins'). From there execute the
:PackerInstall command to install any plugins you list in your specification.
If you are working through this guide to setup Noevim as a Java IDE, it is easiest if you add a single plugin at a time, understand how to configure it, how to use it, and what functionality it provides, and then add more plugins. This way you get a better sense of what changes you are making to the Neovim environment without getting overwhelmed.
Language Server — eclipse.jdt.ls
The heart of the Neovim IDE experience is provided by the Language Server Protocol. To enable IDE-like support for a language requires a language server to be running. For Java, the de-facto standard is eclipse.jdt.ls — The Eclipse JDT Language Server.
You can install it with Homebrew on macOS, making sure to note down the installation location (in particular the version number):
$ > brew install jdtls

...

==> Pouring jdtls--1.18.0.all.bottle.tar.gz
🍺  /opt/homebrew/Cellar/jdtls/1.18.0: 99 files, 42.8MB
On my machine, the install location is /opt/homebrew/Cellar/jdtls/1.18.0, we
are going to need that later to setup the LSP client.
Language Server Client - Neovim and nvim-jdtls
Neovim supports the Language Server Protocol (LSP) out of the box, acting as a
client to LSP servers and including a Lua framework called vim.lsp for
building enhanced LSP tools. The general advice for getting started with the
built-in client is to use
nvim-lspconfig, which provides
default configurations for many different
languages.
Some languages have plugins supporting richer LSP functionality. Java is one of
them. nvim-jdtls provides
extensions to the built-in LSP client like organizing imports, extracting
variables, and code generation. Both nvim-lspconfig and nvim-jdtls use the
client built into Neovim, the main differences are that nvim-jdtls adds some
additional handlers and functionality, as well as simplifying the
configuration. One of the advantages of using nvim-jdtls is that, once up and
running, you can use the same Neovim keybindings and client functionality that
you may already be using for other lanuages without having to learn a
plugin-specific way of interacting.
The following diagram, from the nvim-jdtls documentation, shows how it
differs from nvim-lspconfig. Both use the Lua bindings already built-in to
Neovim, but are setup and configured slightly differently.
┌────────────┐           ┌────────────────┐
│ nvim-jdtls │           │ nvim-lspconfig │
└────────────┘           └────────────────┘
     |                         |
    start_or_attach           nvim_lsp.jdtls.setup
     │                              |
     │                             setup java filetype hook
     │    ┌─────────┐                  │
     └───►│ vim.lsp │◄─────────────────┘
          └─────────┘
Configuring nvim-jdtls can be intimidating. The following example
configuration is commented to show how I setup nvim-jdtls on my development
machine. Most of the options come directly from the Eclipse JDTLS
documentation
and are specific to jdtls.
local home = os.getenv('HOME')
local jdtls = require('jdtls')

-- File types that signify a Java project's root directory. This will be
-- used by eclipse to determine what constitutes a workspace
local root_markers = {'gradlew', 'mvnw', '.git'}
local root_dir = require('jdtls.setup').find_root(root_markers)

-- eclipse.jdt.ls stores project specific data within a folder. If you are working
-- with multiple different projects, each project must use a dedicated data directory.
-- This variable is used to configure eclipse to use the directory name of the
-- current project found using the root_marker as the folder for project specific data.
local workspace_folder = home .. "/.local/share/eclipse/" .. vim.fn.fnamemodify(root_dir, ":p:h:t")

-- Helper function for creating keymaps
function nnoremap(rhs, lhs, bufopts, desc)
  bufopts.desc = desc
  vim.keymap.set("n", rhs, lhs, bufopts)
end

-- The on_attach function is used to set key maps after the language server
-- attaches to the current buffer
local on_attach = function(client, bufnr)
  -- Regular Neovim LSP client keymappings
  local bufopts = { noremap=true, silent=true, buffer=bufnr }
  nnoremap('gD', vim.lsp.buf.declaration, bufopts, "Go to declaration")
  nnoremap('gd', vim.lsp.buf.definition, bufopts, "Go to definition")
  nnoremap('gi', vim.lsp.buf.implementation, bufopts, "Go to implementation")
  nnoremap('K', vim.lsp.buf.hover, bufopts, "Hover text")
  nnoremap('<C-k>', vim.lsp.buf.signature_help, bufopts, "Show signature")
  nnoremap('<space>wa', vim.lsp.buf.add_workspace_folder, bufopts, "Add workspace folder")
  nnoremap('<space>wr', vim.lsp.buf.remove_workspace_folder, bufopts, "Remove workspace folder")
  nnoremap('<space>wl', function()
    print(vim.inspect(vim.lsp.buf.list_workspace_folders()))
  end, bufopts, "List workspace folders")
  nnoremap('<space>D', vim.lsp.buf.type_definition, bufopts, "Go to type definition")
  nnoremap('<space>rn', vim.lsp.buf.rename, bufopts, "Rename")
  nnoremap('<space>ca', vim.lsp.buf.code_action, bufopts, "Code actions")
  vim.keymap.set('v', "<space>ca", "<ESC><CMD>lua vim.lsp.buf.range_code_action()<CR>",
    { noremap=true, silent=true, buffer=bufnr, desc = "Code actions" })
  nnoremap('<space>f', function() vim.lsp.buf.format { async = true } end, bufopts, "Format file")

  -- Java extensions provided by jdtls
  nnoremap("<C-o>", jdtls.organize_imports, bufopts, "Organize imports")
  nnoremap("<space>ev", jdtls.extract_variable, bufopts, "Extract variable")
  nnoremap("<space>ec", jdtls.extract_constant, bufopts, "Extract constant")
  vim.keymap.set('v', "<space>em", [[<ESC><CMD>lua require('jdtls').extract_method(true)<CR>]],
    { noremap=true, silent=true, buffer=bufnr, desc = "Extract method" })
end

local config = {
  flags = {
    debounce_text_changes = 80,
  },
  on_attach = on_attach,  -- We pass our on_attach keybindings to the configuration map
  root_dir = root_dir, -- Set the root directory to our found root_marker
  -- Here you can configure eclipse.jdt.ls specific settings
  -- These are defined by the eclipse.jdt.ls project and will be passed to eclipse when starting.
  -- See https://github.com/eclipse/eclipse.jdt.ls/wiki/Running-the-JAVA-LS-server-from-the-command-line#initialize-request
  -- for a list of options
  settings = {
    java = {
      format = {
        settings = {
          -- Use Google Java style guidelines for formatting
          -- To use, make sure to download the file from https://github.com/google/styleguide/blob/gh-pages/eclipse-java-google-style.xml
          -- and place it in the ~/.local/share/eclipse directory
          url = "/.local/share/eclipse/eclipse-java-google-style.xml",
          profile = "GoogleStyle",
        },
      },
      signatureHelp = { enabled = true },
      contentProvider = { preferred = 'fernflower' },  -- Use fernflower to decompile library code
      -- Specify any completion options
      completion = {
        favoriteStaticMembers = {
          "org.hamcrest.MatcherAssert.assertThat",
          "org.hamcrest.Matchers.*",
          "org.hamcrest.CoreMatchers.*",
          "org.junit.jupiter.api.Assertions.*",
          "java.util.Objects.requireNonNull",
          "java.util.Objects.requireNonNullElse",
          "org.mockito.Mockito.*"
        },
        filteredTypes = {
          "com.sun.*",
          "io.micrometer.shaded.*",
          "java.awt.*",
          "jdk.*", "sun.*",
        },
      },
      -- Specify any options for organizing imports
      sources = {
        organizeImports = {
          starThreshold = 9999;
          staticStarThreshold = 9999;
        },
      },
      -- How code generation should act
      codeGeneration = {
        toString = {
          template = "${object.className}{${member.name()}=${member.value}, ${otherMembers}}"
        },
        hashCodeEquals = {
          useJava7Objects = true,
        },
        useBlocks = true,
      },
      -- If you are developing in projects with different Java versions, you need
      -- to tell eclipse.jdt.ls to use the location of the JDK for your Java version
      -- See https://github.com/eclipse/eclipse.jdt.ls/wiki/Running-the-JAVA-LS-server-from-the-command-line#initialize-request
      -- And search for `interface RuntimeOption`
      -- The `name` is NOT arbitrary, but must match one of the elements from `enum ExecutionEnvironment` in the link above
      configuration = {
        runtimes = {
          {
            name = "JavaSE-17",
            path = home .. "/.asdf/installs/java/corretto-17.0.4.9.1",
          },
          {
            name = "JavaSE-11",
            path = home .. "/.asdf/installs/java/corretto-11.0.16.9.1",
          },
          {
            name = "JavaSE-1.8",
            path = home .. "/.asdf/installs/java/corretto-8.352.08.1"
          },
        }
      }
    }
  },
  -- cmd is the command that starts the language server. Whatever is placed
  -- here is what is passed to the command line to execute jdtls.
  -- Note that eclipse.jdt.ls must be started with a Java version of 17 or higher
  -- See: https://github.com/eclipse/eclipse.jdt.ls#running-from-the-command-line
  -- for the full list of options
  cmd = {
    home .. "/.asdf/installs/java/corretto-17.0.4.9.1/bin/java",
    '-Declipse.application=org.eclipse.jdt.ls.core.id1',
    '-Dosgi.bundles.defaultStartLevel=4',
    '-Declipse.product=org.eclipse.jdt.ls.core.product',
    '-Dlog.protocol=true',
    '-Dlog.level=ALL',
    '-Xmx4g',
    '--add-modules=ALL-SYSTEM',
    '--add-opens', 'java.base/java.util=ALL-UNNAMED',
    '--add-opens', 'java.base/java.lang=ALL-UNNAMED',
    -- If you use lombok, download the lombok jar and place it in ~/.local/share/eclipse
    '-javaagent:' .. home .. '/.local/share/eclipse/lombok.jar',

    -- The jar file is located where jdtls was installed. This will need to be updated
    -- to the location where you installed jdtls
    '-jar', vim.fn.glob('/opt/homebrew/Cellar/jdtls/1.18.0/libexec/plugins/org.eclipse.equinox.launcher_*.jar'),

    -- The configuration for jdtls is also placed where jdtls was installed. This will
    -- need to be updated depending on your environment
    '-configuration', '/opt/homebrew/Cellar/jdtls/1.18.0/libexec/config_mac',

    -- Use the workspace_folder defined above to store data for this project
    '-data', workspace_folder,
  },
}

-- Finally, start jdtls. This will run the language server using the configuration we specified,
-- setup the keymappings, and attach the LSP client to the current buffer
jdtls.start_or_attach(config)
To start jdtls using this configuration, place the file above in the folder
.config\nvim\ftplugin\java.lua. Neovim will automatically execute this code
whenever a file of type Java is loaded into the current buffer. (ftplugin
is shorthand for filetype plugin).
Although the configuration seems like a lot, it can be broken down into a few
sections. First, we create the required keymappings for the LSP client. Then we
specify the options to pass to eclipse.jdt.ls, and lastly, we set the command
to use to launch eclipse.jdt.ls. Once we get that configuration in place, we
pass it as a parameter to jdtls.start_or_attach, which will start the
language server or attach to an existing running instance if the server is
already started.
Assuming you are able to get jdtls up and running, the following screencast shows how to extract a method using jdtls. The available code actions are rendered using telescope.nvim.
Debugging — nvim-dap
The Debug Adapter Protocol (DAP) is a companion project to the Language Server Protocol. The idea behind the Debug Adapter Protocol (DAP) is to abstract away how the debugging support of development tools communicates with debuggers or runtimes. Because debuggers already exist for many languages, DAP works alongside an adapter to match an existing debugger or runtime to the debug adapter protocol, rather than assuming a new debugger needs to be written to match the protocol.
nvim-dap is a DAP client
implementation. Working alongside a debug adapter, nvim-dap can launch an
application to debug, attach to running applications, set breakpoints, step
through code, and inspect the state of an application.
nvim-dap requires a debug adapter that acts as a facilitator between nvim-dap
(the client), and a language-specific debugger. The following diagram, from the
nvim-dap documentation, shows how these pieces interact.
DAP-Client ----- Debug Adapter ------- Debugger ------ Debugee
(nvim-dap)  |   (per language)  |   (per language)    (your app)
            |                   |
            |        Implementation specific communication
            |        Debug adapter and debugger could be the same process
            |
     Communication via the Debug Adapter Protocol
Like the LSP protocol, the DAP protocol requires us to install additional components. Unfortunately, perhaps due to the relative immaturity of the DAP protocol, the process is more involved than for the LSP server.
The Java Debug Server is an
implementation of the Debug Adapter Protocol available on
Github. The implementation is based
on the Java Debug Interface (JDI). It works with the Eclipse JDT Language
Server as a plugin to provide debug functionality by wrapping the debug server
in an Eclipse plugin that works with jdtls. To register java-debug as an
Eclipse plugin we need to pass the location of the jar files to Eclipse as an
initialization option. This requires first compiling the plugin, and second
configuring Eclipse to use the plugin.
Compiling the plugin is done through Maven:
- Clone java-debug
- Navigate into the cloned repository (
cd java-debug) - Run
./mvnw clean install
Once complete, you can pass the location of the jar file as a configuration option for Eclipse. Your jdtls configuration will need to be extended with something like the following:
local bundles = {
  vim.fn.glob('<path-to-java-debug>/com.microsoft.java.debug.plugin/target/com.microsoft.java.debug.plugin-*.jar'),
}
local config = {
  ...
  on_attach = on_attach,
  init_options = {
    bundles = bundles
  },
  ...
}
Then, you need to notify nvim-jdtls that a debug adapter is available for
use. In your on_attach function, add require('jdtls').setup_dap() to have
it register a java adapter.
config['on_attach'] = function(client, bufnr)
  -- With `hotcodereplace = 'auto' the debug adapter will try to apply code changes
  -- you make during a debug session immediately.
  -- Remove the option if you do not want that.
  require('jdtls').setup_dap({ hotcodereplace = 'auto' })
end
nvim-dap supports a subset of the launch.json file format used to configure
debug adapters in Visual Studio Code. To load a launch.json file, use the
load_launchjs function from the dap.ext.vscode module. The following code
will load any launch configurations available in the current project:
require('dap.ext.vscode').load_launchjs()
Lastly, you need to configure debug keymappings. These are the ones I use, you may want to edit them to suit your needs.
function nnoremap(rhs, lhs, bufopts, desc)
  bufopts.desc = desc
  vim.keymap.set("n", rhs, lhs, bufopts)
end


-- nvim-dap
nnoremap("<leader>bb", "<cmd>lua require'dap'.toggle_breakpoint()<cr>", "Set breakpoint")
nnoremap("<leader>bc", "<cmd>lua require'dap'.set_breakpoint(vim.fn.input('Breakpoint condition: '))<cr>", "Set conditional breakpoint")
nnoremap("<leader>bl", "<cmd>lua require'dap'.set_breakpoint(nil, nil, vim.fn.input('Log point message: '))<cr>", "Set log point")
nnoremap('<leader>br', "<cmd>lua require'dap'.clear_breakpoints()<cr>", "Clear breakpoints")
nnoremap('<leader>ba', '<cmd>Telescope dap list_breakpoints<cr>', "List breakpoints")

nnoremap("<leader>dc", "<cmd>lua require'dap'.continue()<cr>", "Continue")
nnoremap("<leader>dj", "<cmd>lua require'dap'.step_over()<cr>", "Step over")
nnoremap("<leader>dk", "<cmd>lua require'dap'.step_into()<cr>", "Step into")
nnoremap("<leader>do", "<cmd>lua require'dap'.step_out()<cr>", "Step out")
nnoremap('<leader>dd', "<cmd>lua require'dap'.disconnect()<cr>", "Disconnect")
nnoremap('<leader>dt', "<cmd>lua require'dap'.terminate()<cr>", "Terminate")
nnoremap("<leader>dr", "<cmd>lua require'dap'.repl.toggle()<cr>", "Open REPL")
nnoremap("<leader>dl", "<cmd>lua require'dap'.run_last()<cr>", "Run last")
nnoremap('<leader>di', function() require"dap.ui.widgets".hover() end, "Variables")
nnoremap('<leader>d?', function() local widgets=require"dap.ui.widgets";widgets.centered_float(widgets.scopes) end, "Scopes")
nnoremap('<leader>df', '<cmd>Telescope dap frames<cr>', "List frames")
nnoremap('<leader>dh', '<cmd>Telescope dap commands<cr>', "List commands")
Sadly, the java-debug project doesn’t support debugging tests and we need to
setup another plugin for that. Thankfully, it follows a similar process. To
be able to debug tests, it is necessary to install the bundles from
vscode-java-test with the same
procedure we used for java-debug:
First build the jar files from the project.
- Clone the repository
- Navigate into the folder (
cd vscode-java-test) - Run
npm install - Run
npm run build-plugin
Then, extend the bundles in the nvim-jdtls configuration to include the ones
from vs-code-java-test:
-- This bundles definition is the same as in the previous section (java-debug installation)
local bundles = {
  vim.fn.glob("<path-to-java-debug>/com.microsoft.java.debug.plugin/target/com.microsoft.java.debug.plugin-*.jar", 1),
};

-- This is the new part
vim.list_extend(bundles, vim.split(vim.fn.glob("<path-to-vscode-java-test>/server/*.jar", 1), "\n"))

local config = {
  ...
  on_attach = on_attach,
  init_options = {
    bundles = bundles
  },
  ...
}
This expose two new functions available to nvim-jdtls that I configure with
the following keymappings.
nnoremap("<leader>vc", jdtls.test_class, bufopts, "Test class (DAP)")
nnoremap("<leader>vm", jdtls.test_nearest_method, bufopts, "Test method (DAP)")
The following screencast shows running and debugging a test using nvim-dap.
Once the breakpoint is hit, I open the scopes view to inspect the state of the
current stack frame.
Code Completion — nvim-cmp
The next feature required to create a full-featured IDE experience is code
completion. For this, I turn to a general purpose completion plugin for Neovim
called nvim-cmp. nvim-cmp works as a
core plugin that is extended with completion sources. Sources can be code
snippets, LSP symbols, or words from the current buffer.
To get started with nvim-cmp, first install the nvim-cmp plugin along with
any completion sources you need. Here I install nvim-cmp and the lsp and
snippet sources I use.
return require('packer').startup(function(use)
  ...
  use 'hrsh7th/nvim-cmp'
  use 'hrsh7th/cmp-nvim-lsp'
  use 'hrsh7th/cmp-vsnip'
  use 'hrsh7th/vim-vsnip'
  ...
end)
Language servers provide different completion results depending on the
capabilities of the client. nvim-cmp supports more types of completion
candidates than Neovim’s default omnifunc, so we must advertise the available
capabilities sent to the server so that it can provide these candidates during
a completion request. These capabilities are provided via the helper function
require('cmp_nvim_lsp').default_capabilities which can be added to our jdtls
configuration.
-- The nvim-cmp supports additional LSP's capabilities so we need to
-- advertise it to LSP servers..
local capabilities = vim.lsp.protocol.make_client_capabilities()
capabilities = require('cmp_nvim_lsp').default_capabilities(capabilities)

local config = {
  ...
  capabilities = capabilities,
  on_attach = on_attach,
  ...
}
Then, we need to configure nvim-cmp itself. The following snippet of code
names the completion sources that we want to use, the snippet plugin we are
using, and configures the Tab key to cycle through completion options and the
Enter key for selecting a completion.
local cmp = require('cmp')
cmp.setup {
  sources = {
    { name = 'nvim_lsp' },
    { name = 'nvim_lsp_signature_help' },
    { name = 'vsnip' },
  },
  snippet = {
    expand = function(args)
      vim.fn["vsnip#anonymous"](args.body) -- because we are using the vsnip cmp plugin
    end,
  },
  mapping = cmp.mapping.preset.insert({
    ['<C-d>'] = cmp.mapping.scroll_docs(-4),
    ['<C-f>'] = cmp.mapping.scroll_docs(4),
    ['<C-Space>'] = cmp.mapping.complete(),
    ['<CR>'] = cmp.mapping.confirm {
      behavior = cmp.ConfirmBehavior.Replace,
      select = true,
    },
    ['<Tab>'] = cmp.mapping(function(fallback)
      if cmp.visible() then
        cmp.select_next_item()
      else
        fallback()
      end
    end, { 'i', 's' }),
    ['<S-Tab>'] = cmp.mapping(function(fallback)
      if cmp.visible() then
        cmp.select_prev_item()
      else
        fallback()
      end
    end, { 'i', 's' }),
  }),
}
And, if you want to display symbols next to your completion results, install
the onsails/lspkind.nvim plugin, and configure it by adding a formatting
block to our cmp configuration.
local lspkind = require('lspkind')

cmp.setup {
  ...
  formatting = {
    format = lspkind.cmp_format({
      mode = 'symbol_text',
      maxwidth = 50,
      ellipsis_char = '...',
      before = function (_, vim_item)
        return vim_item
      end
    })
  }
  ...
}
In the screencast below, I show how nvim-cmp displays the set of available
completions given by the LSP protocol. The icons next to each completion type
come from lspkind.
Finder — telescope-nvim
telescope.nvim is a highly
extendable fuzzy finder over lists. telescope provides the interface and
functionality for filtering and selecting items from lists. Like nvim-cmp,
telescope is extensible by adding additional sources of lists
that telescope will display and filter.
My telescope configuration uses fzf for increased performance, this requires
installing telescope-fzf-native using the following configuration:
use {'nvim-telescope/telescope-fzf-native.nvim', run = 'make' }
When working with Java projects, the default project structure leads to long
directory names. To truncate directory names, and use fzf for increased
performance, I use the following configuration:
require('telescope').setup({
  defaults = {
    path_display = {
      shorten = {
        len = 3, exclude = {1, -1}
      },
      truncate = true
    },
    dynamic_preview_title = true,
  },
  extensions = {
    fzf = {
      fuzzy = true,                    -- false will only do exact matching
      override_generic_sorter = true,  -- override the generic sorter
      override_file_sorter = true,     -- override the file sorter
      case_mode = "smart_case",        -- or "ignore_case" or "respect_case"
                                       -- the default case_mode is "smart_case"
    }
  }
})
require('telescope').load_extension('fzf')
I use telescope fairly extensively and use a set of keymappings pre-fixed with
f for find.
-- telescope
nnoremap("<leader>ff", "<cmd>Telescope find_files<cr>", "Find file")
nnoremap("<leader>fg", "<cmd>Telescope live_grep<cr>", "Grep")
nnoremap("<leader>fb", "<cmd>Telescope buffers<cr>", "Find buffer")
nnoremap("<leader>fm", "<cmd>Telescope marks<cr>", "Find mark")
nnoremap("<leader>fr", "<cmd>Telescope lsp_references<cr>", "Find references (LSP)")
nnoremap("<leader>fs", "<cmd>Telescope lsp_document_symbols<cr>", "Find symbols (LSP)")
nnoremap("<leader>fc", "<cmd>Telescope lsp_incoming_calls<cr>", "Find incoming calls (LSP)")
nnoremap("<leader>fo", "<cmd>Telescope lsp_outgoing_calls<cr>", "Find outgoing calls (LSP)")
nnoremap("<leader>fi", "<cmd>Telescope lsp_implementations<cr>", "Find implementations (LSP)")
nnoremap("<leader>fx", "<cmd>Telescope diagnostics bufnr=0<cr>", "Find errors (LSP)")
In this screencast, I show how telescope can be used as a file browser to
quickly find and open a file.
Structure — symbols-outline
Another IDE feature I take advantage of us file structure. This feature provides a hierachical, tree-like view of the symbols in the current file and how they relate to one another. For this, I turn to a relatively simple plugin called symbols-outline. The default options work fine for my use case, with one small addition: auto-closing the outline when I make a selection. I use the following configuration to automatically close the outline:
require("symbols-outline").setup {
  auto_close = true,
}
The following keymapping also makes it easy to resize the outline using
CTRL-SHIFT-Right Arrow and CTRL-SHIFT-Left Arrow.
-- window management
nnoremap("<C-S-Right>", "<cmd>:vertical resize -1<cr>", "Minimize window")
nnoremap("<C-S-Left>", "<cmd>:vertical resize +1<cr>", "Maximize window")
In this screencast I open a file, then navigate the top-level symbols using the outline plugin, and select one to jump to.
File Browser — nvim-tree
The nvim-tree plugin is a file explorer written in Lua. Once installed, I use the following keymappings to open and close the file browser:
-- nvim-tree
nnoremap("<leader>nn", "<cmd>NvimTreeToggle<cr>", "Open file browser")
nnoremap("<leader>nf", "<cmd>NvimTreeFindFile<cr>", "Find in file browser")
I also disable netrw since I don’t use it and it can conflict with
nvim-tree. I also configure the file browser window to automically close when
I make a selection and to size itself to the correct width automatically.
require("nvim-tree").setup({
  disable_netrw = true,
  view = {
    adaptive_size = true,
    float = {
      enable = true,
    },
  },
  actions = {
    open_file = {
      quit_on_open = true,
    }
  }
})
The screencast below shows nvim-tree being used as a file browser.
Status Line - lualine
lualine is a statusline plugin
written in Lua. The statusline plugin shows helpful information about the
current file such as filetype, git branch, and encoding. The only change I make
to lualine is to set the theme to match my terminal colour theme:
require('lualine').setup {
  options = { theme = 'onedark' },
}
The End Result
The Language Server Protocol provides an excellent backbone for developing full-featured IDEs. The addition of an LSP client in Neovim, along with plugins that help with the user interface, complete the picture. After spending some time with the configuration and setup I’ve described in this post, I’ve been able to turn Neovim into a Java IDE that I use as my daily work environment.
To get you started on your own journey towards a Neovim-based IDE, you can view my full configuration on Github.